‘ab Recorder’ for iOS
‘ab Recorder’ for iOS is compatible with iOS devices that support Ambisonics recording (e.g. iPhone 16 Pro / Pro Max and above).
All recordings created with ‘ab Recorder’ are 100% compatible with any of our plugins in Ambisonics mode (processors, EQ, Decoders, etc), and are also compatible with any audio tool that supports B-FORMAT, Ambix audio.
Basic Functions.
Just like all our software, ‘ab Recorder’ has ONE important thing to offer you: EASE. You will not need to dwell in a sea of settings or unknown terms to start capturing your immersive media!
Upon loading for the first time, ‘ab Recorder’ opens as a simple Audio Recorder, ready to capture Ambisonics signals - all you have to do is press the “Rec” button to start capturing; however, there are so many details that will help you get the best of your Ambisonics recordings.
Two modes exist in ‘ab Recorder’: Audio Mode and Video Mode.
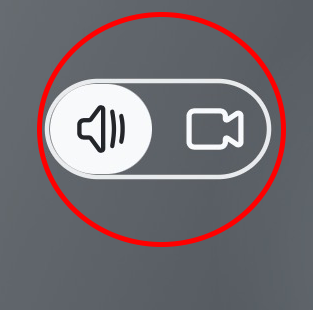
Audio Mode: Only record a lossless Ambisonics WAV.
Video Mode: Record a lossless Ambisonics WAV together with a video.
Audio Mode.
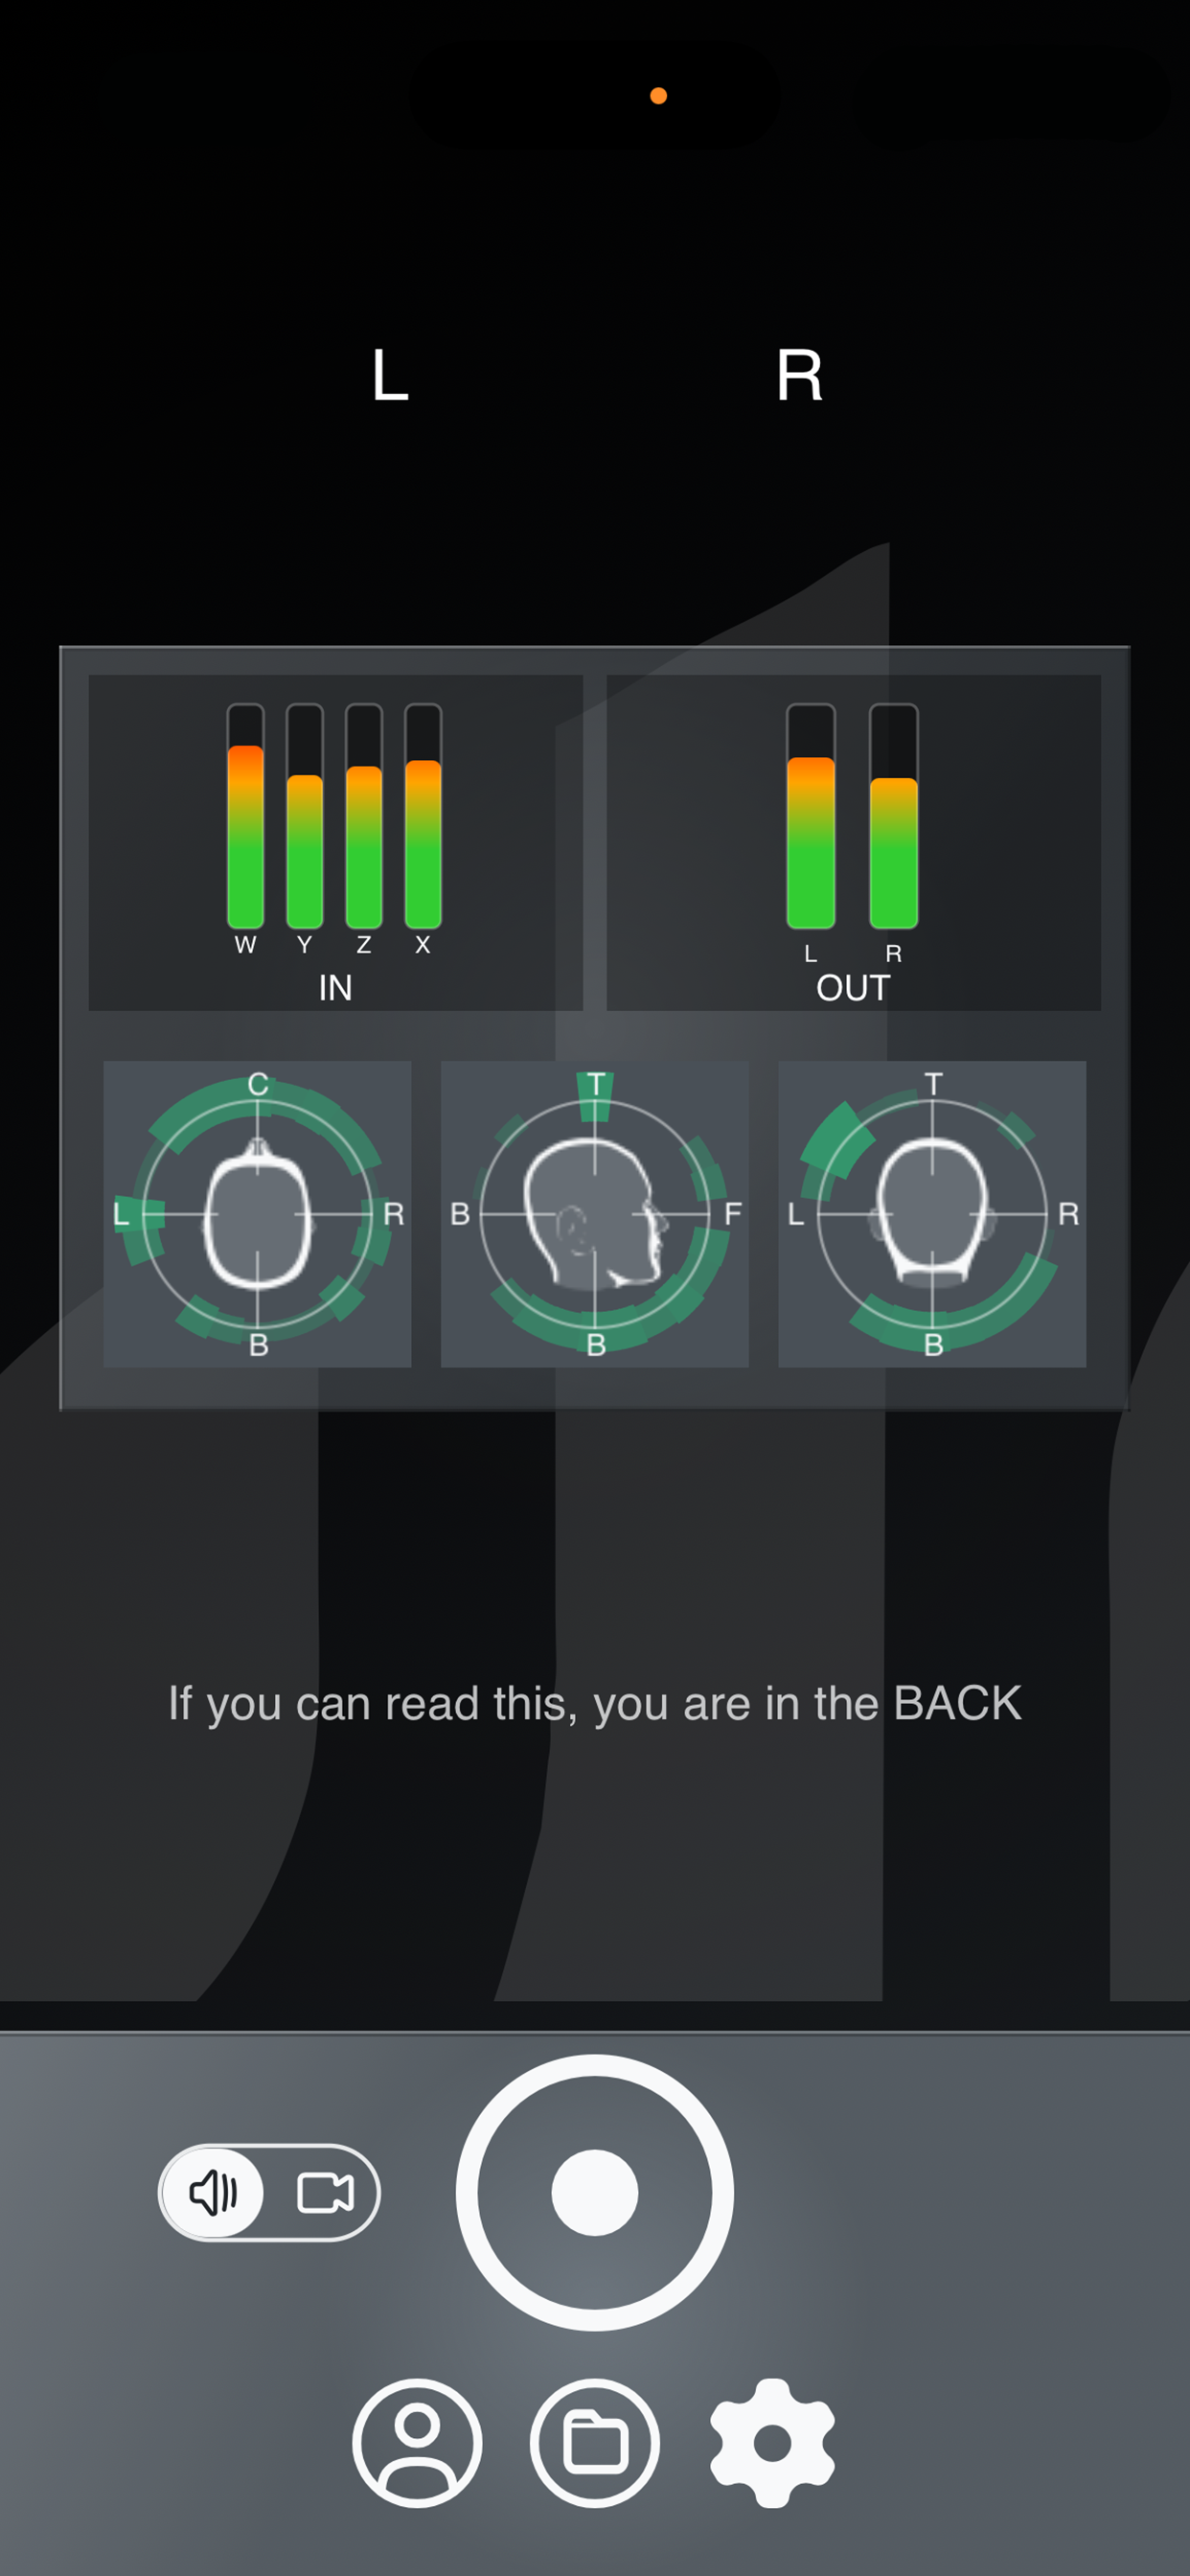
In Audio Mode, ‘ab Recorder’ displays IN and OUT metres so that you can keep your signal flow.
Additionally, our easy-to-understand Visualiser is also available to give you a visual representation of what’s going on in the soundfield you’re recording.
ORIENTATION
Regardless of how your device is positioned (portrait or landscape), L R labels exist to always guide you on where the LEFT and RIGHT of your recordings are.
As you rotate your device, you will see that the L R labels rotate, too. That’s because the soundfield is also rotating to always keep LEFT and RIGHT positioned. This means you can capture audio with your device positioned vertically or horizontally in any direction!

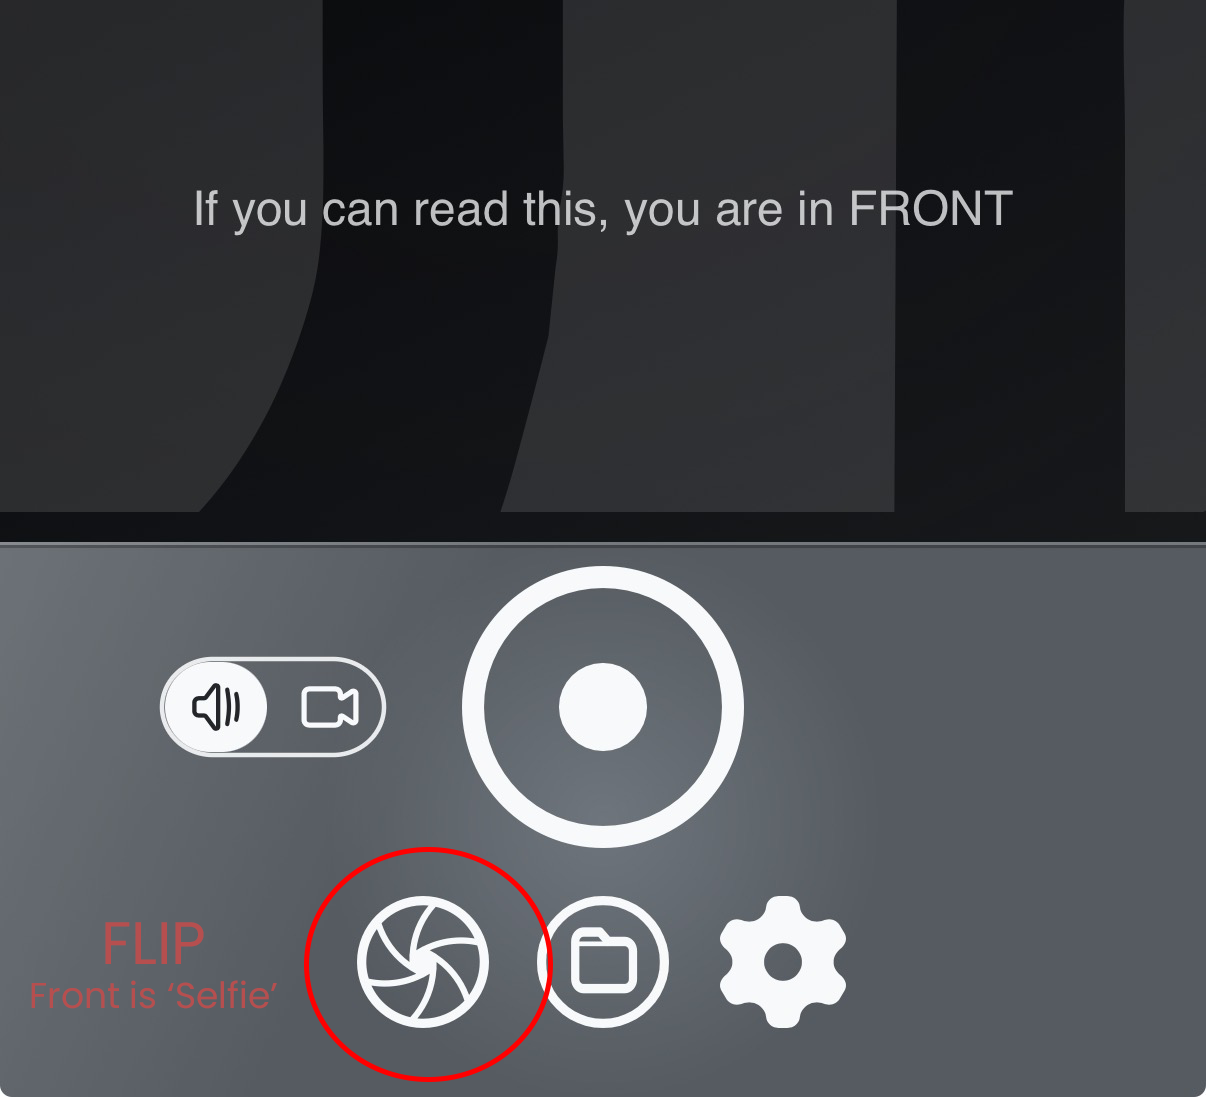
‘What’s the front?’ you may ask. Well, that depends on what you want it to be. By using the FLIP button, you can set the front of your soundfield to be the ‘Selfie’ camera or the ‘Main’ camera. Depending on what you have set with your flip button, you will be able to read the text informing you if what you can read is the front or the back of the soundfield.
All the above means that, regardless of having your device in Left Landscape, Right Landscape or Portrait Mode, ‘ab Recorder’ will always record a properly oriented soundfield where LEFT and RIGHT are always the real-world LEFT and RIGHT, and FRONT and BACK are what you decide through the FLIP button.
Important: The soundfield can only be flipped BEFORE starting your recording; once the recording has started, you cannot flip the front/back of the soundfield.
WARING: DO NOT change the orientation of your device (i.e. from Portrait to Landscape modes) WHILE you are recording. The soundfield will always rotate based on the device’s orientation, so when you listen to your recording, you will hear a 90-degree switch in the soundfield!
Video Mode.

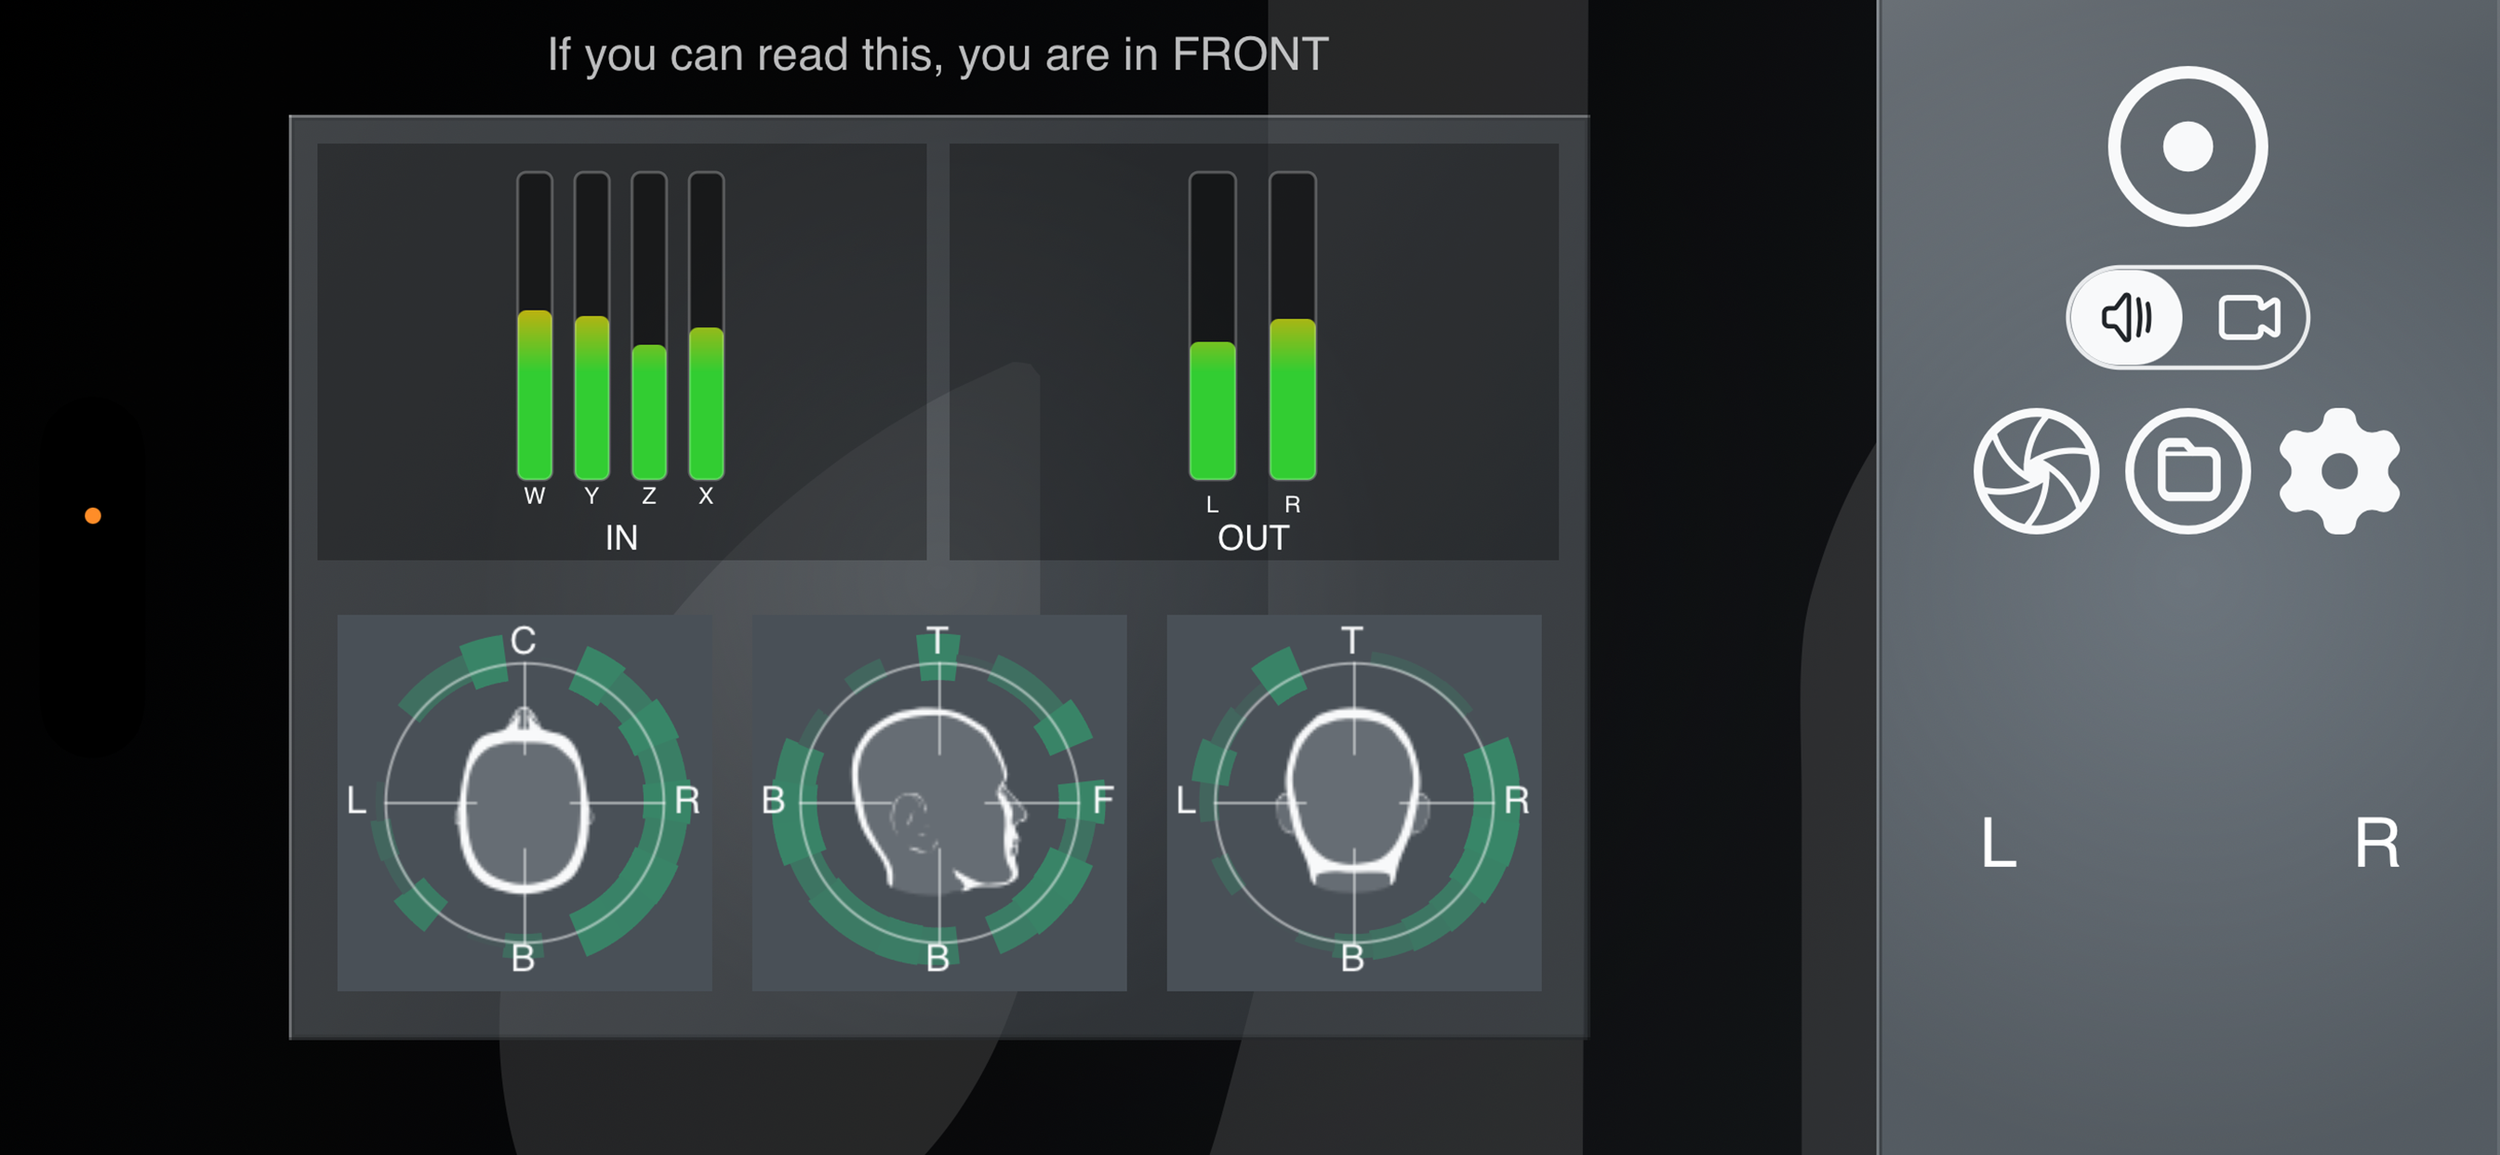
In Video Mode, ‘ab Recorder’ displays IN and OUT metres so that you can keep your signal flow.
Additionally, our easy-to-understand Visualiser is also available to give you a visual representation of what’s going on in the soundfield you’re recording.
ORIENTATION
Regardless of how your device is positioned (portrait or landscape), L R labels exist to always guide you on where the LEFT and RIGHT of your recordings are.
As you rotate your device, you will see that the L R labels rotate, too. That’s because the soundfield is also rotating to always keep LEFT and RIGHT positioned. This means you can capture audio and video with your device positioned vertically or horizontally in any direction!
‘What’s the front?’ you may ask. Well, the front is the camera you have chosen to record from! By using the FLIP button, you can switch between selfie or main cameras, and whichever you choose to record from, that’s the front of your recording!
WARING: DO NOT change the orientation of your device (i.e. from Portrait to Landscape modes) WHILE you are recording. The soundfield will always rotate based on the device’s orientation, so when you listen to your recording, you will hear a 90-degree switch in the soundfield!
ZOOM
When available, Zoom controls will also appear on the side of the screen. You can control the zoom of the camera by either clicking on them or dragging between them (smooth zoom)! Whatever you decide to do with your Zoom will not affect the audio recording; it’s only reflected on the video.
MEDIA PLAYBACK
After you’re done with your recordings, you can playback your media by opening the FILES overlay.

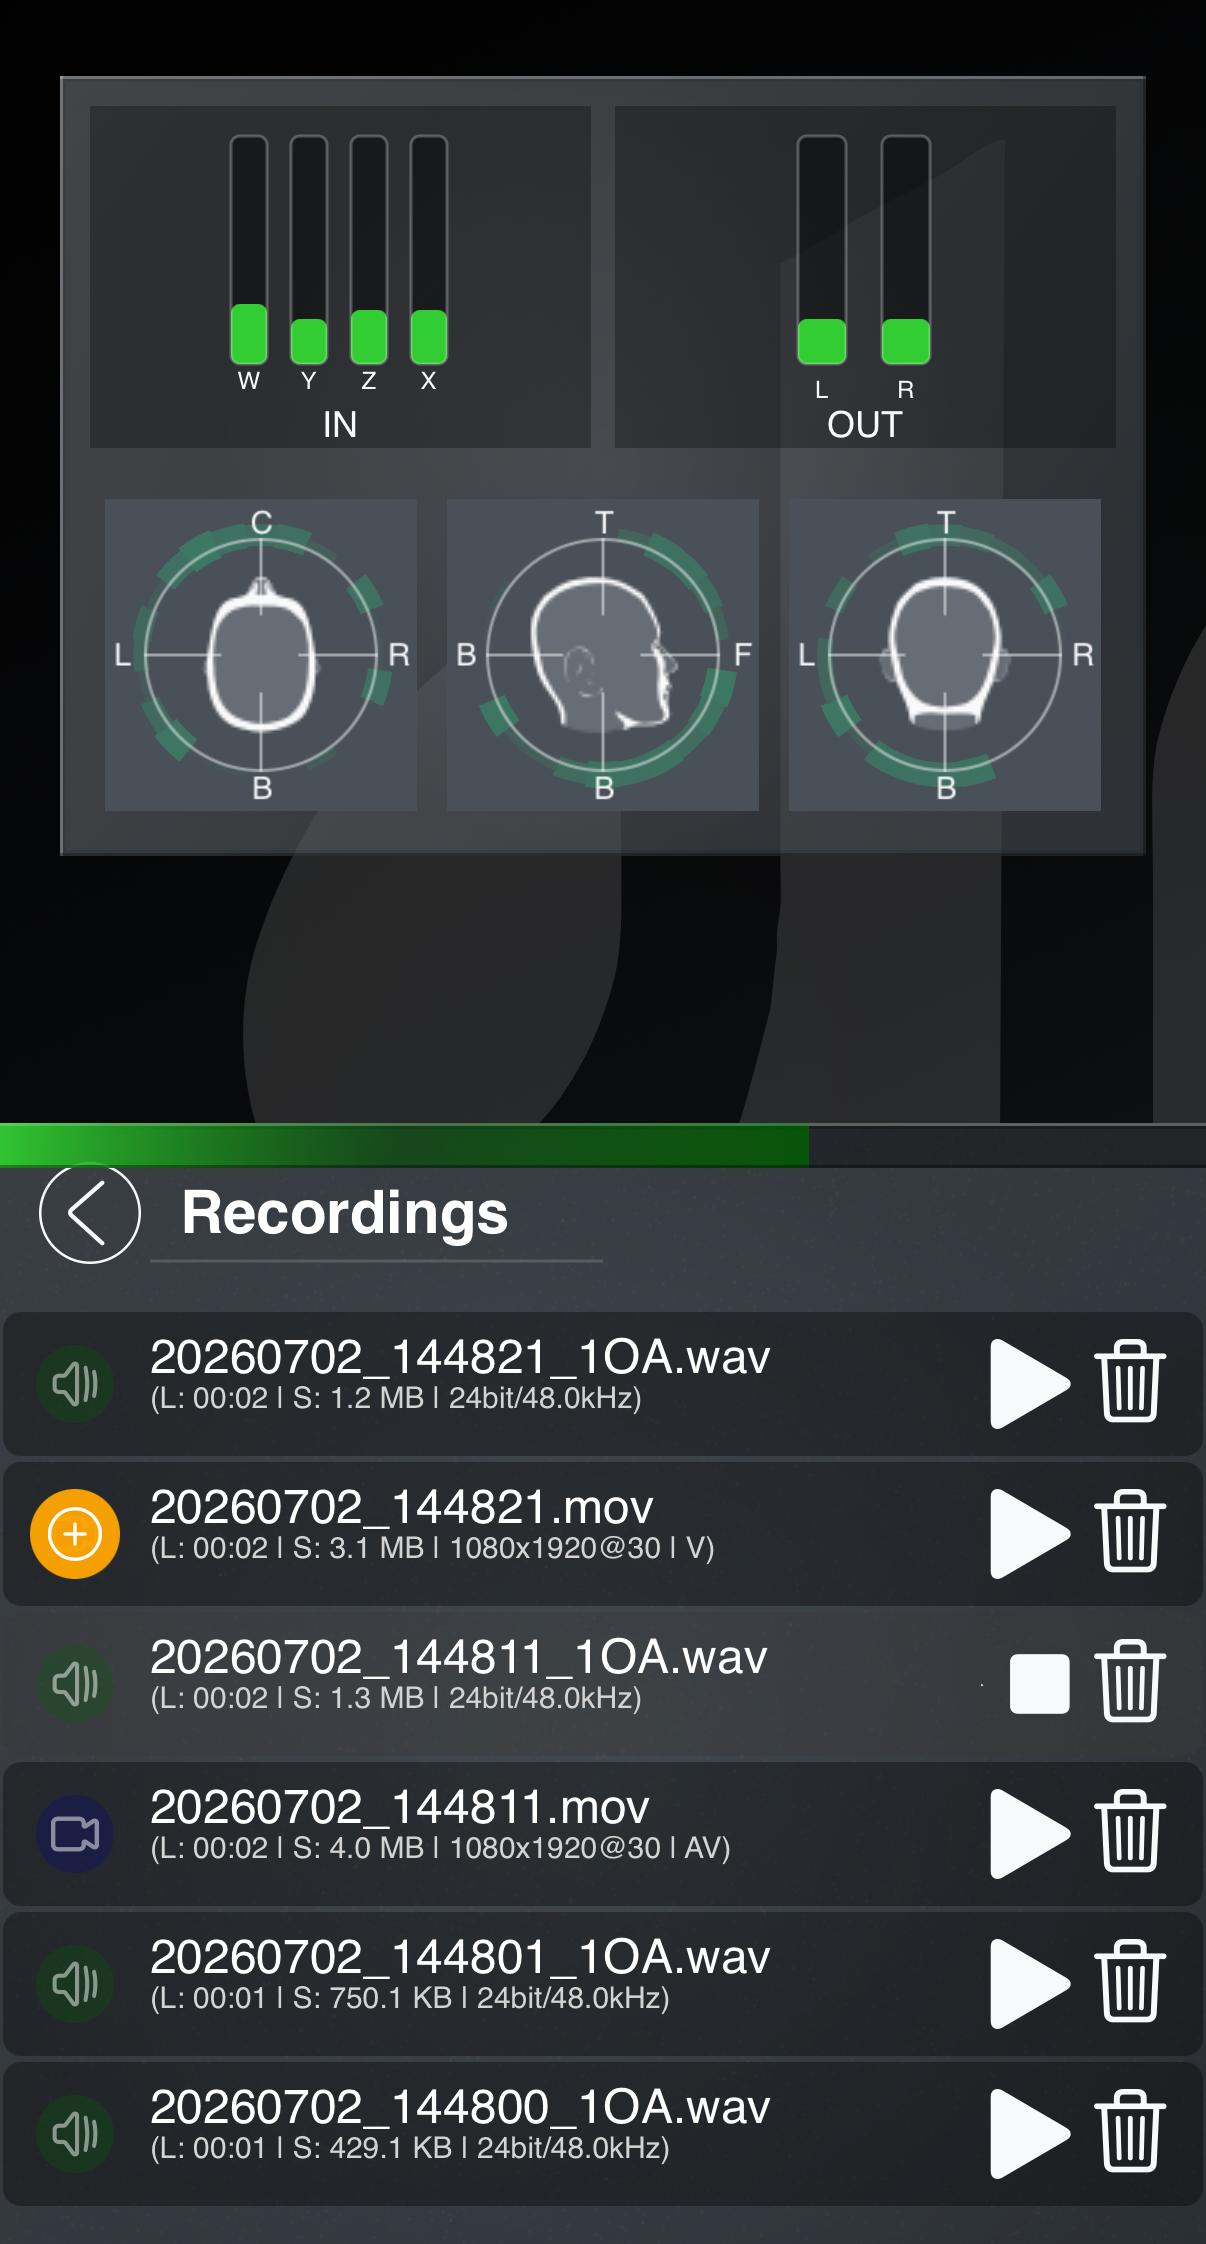
When the FILES overlay is open, the screen will divide into two.
On one side, you will have the Metres and Visualiser that will help you understand the recording you are monitoring.
When you are playing an audio file, you will be able to go back and forth throughout the file by dragging on the green bar. Have in mind that your Ambisonics audio file will be decoded to stereo and played back to you in real time, this is a great way to actually listen to your decoded Ambisonics recording.
When playing a Video file, the iOS video player will be used to display the video. If the video has audio (which can be enabled in the Options menu), the audio in the video will be a stereo-decoded version of the Ambisonics audio that was captured.
On the other side of the screen, you have the file list - each file is a row that provides a lot of information.
First and most importantly, every file is named with the date and time it was taken (YYYYMMDD_HHMMSS). The audio file will have a _1OA text appended, signalling this is a four-channel first-order Ambisonics WAV file.
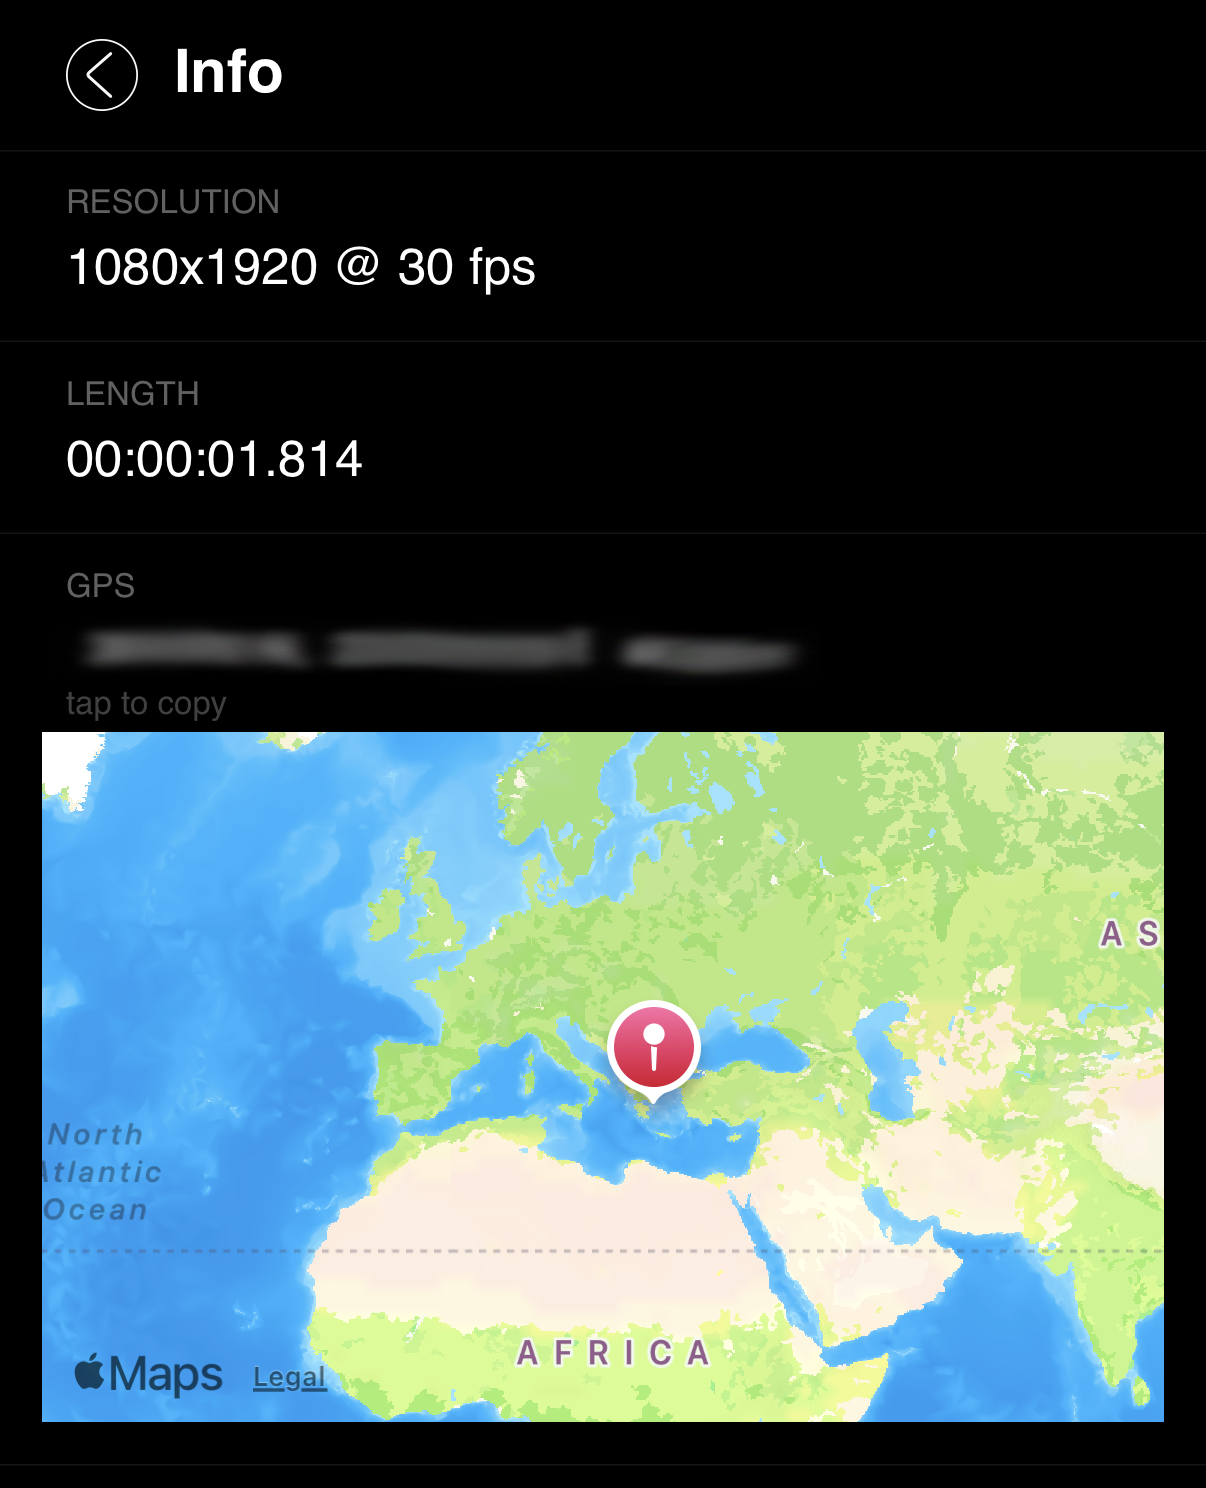
Below the audio/video, you will also be able to see a lot of important information, such as length and size, but also bit-depth, sample rate (for audio), resolution, and frame rate (for video).
On the left side of the row, you can see if the recording is AUDIO (green speaker), VIDEO WITH AUDIO (blue camera), or VIDEO WITHOUT AUDIO (grey camera / orange + sign).
AUDIO-LESS VIDEO:
When the video has been recorded without audio (toggleable in Options), two icons may exist on the left of the file. A GREY video icon in case ‘ab Recorder’ cannot find the matching audio, or an orange + sign, in case ‘ab Recorder’ can find a matching audio. In this case, you can click on the + sign to decode and add the audio to the video. This process can take time depending on the length of the recording, since ‘ab Recorder’ has to decode the audio to Stereo and then mux it with the video.
On the right of the row, you have a PLAY button to monitor your recording, and a delete button to delete it.
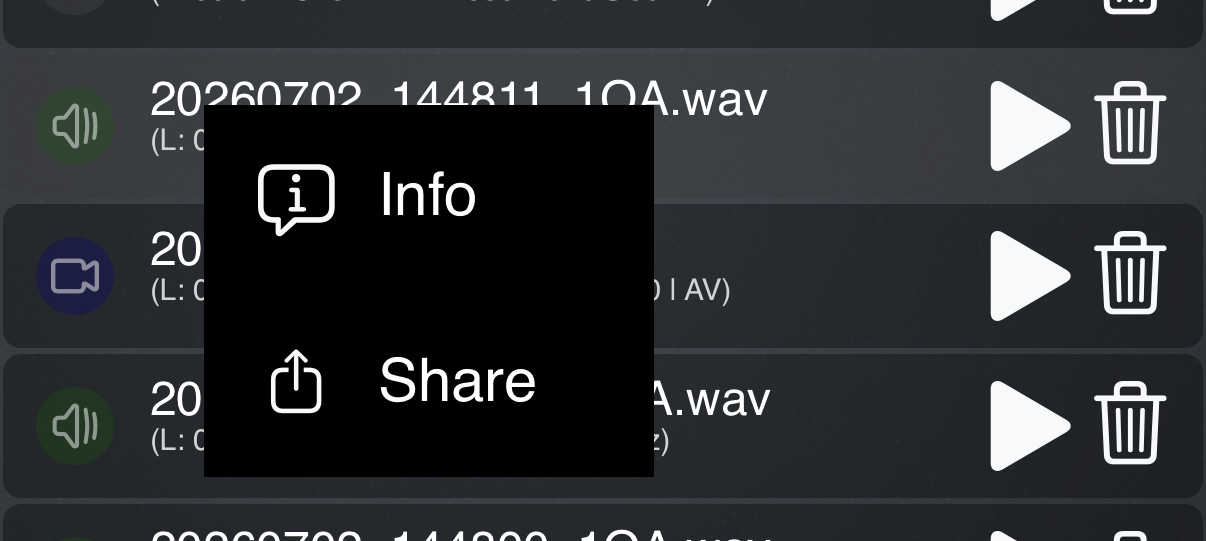
Additionally, if you click and hold on a file, two extra options will be available: INFO to get more information on the file (such as GPS tag, in case it’s available), and SHARE to be able to send the file through AirDrop or any other available method.
OPTIONS

The options menu is very straightforward and contains the most important settings you can go through to get the most of your captures.

AUDIO
In the AUDIO options, you can select the bit-depth at which you will record your audio.
You can choose between 16-bit, 24-bit and 32-bit float.
VIDEO
In the VIDEO options, you can select between a plethora of resolutions (up to 4K) and framerates (up to 60fps), and also toggle the image stabiliser on/off.
If you don’t have the Real-Time Audio addon, you can also toggle to add the audio to the video. This means that as soon as you finish recording a video, ‘ab Recorder’ will decode the audio to stereo and add it to the video. This may take time depending on the length of your recording. If you want to add a decoded version of your audio while you record your video, you can get the Real-Time Audio addon.
Add-Ons
Three Add-ons are currently available for ‘ab Recorder’ that can optionally enhance your recording experience.
Add-ons are ONE-TIME purchases; this means they are yours forever, regardless of you switching devices.
Real-Time Audio

With the Real-Time Audio add-on, while you record video, the Ambisonics Audio is decoded and added to it in real time. This means that as soon as you stop your recording, your video has audio! This saves a lot of time when doing long recordings, and you make sure you avoid accidents while the audio is being decoded and added to the video (e.g. you run out of battery while the process happens, or something unexpected!)
After getting this add-on, there’s nothing you have to do; from then on, all your videos will be recorded with decoded stereo audio in real-time!
GPS

When getting the GPS addon, an extra option to turn on GPS tagging will be available in the Options menu.
After toggling it on and giving the necessary permissions, any new recording you do will contain GPS information of where it was taken. This is great if you don’t want to be writing down when anything took place - you will always have this information embedded in the file.
To see the GPS tags of any audio or video in ‘ab Recorder’, all you have to do is click and hold over the file itself, and go to INFO.
If the video you selected contains GPS data, it will be shown along with the rest of the available information.
Note: You can click on the GPS coordinates to copy them so that you can also paste them as plain text!
Because GPS tags are not standardised in the WAV files, your Ambisonics WAV recordings have GPS embedded as metadata chunks. The easiest ways to read them on a computer is using a tool like exiftool and running the command below:
exiftool filename.wav
On a terminal/command window.
Dual Camera
The Dual Camera addon is a great way to record both from main and selfie cameras at the same time, WHILE recording your lossless Ambisonics WAV!
After getting the Add-on, a new setting in the Video Options is available where you can toggle Dual Camera on and off

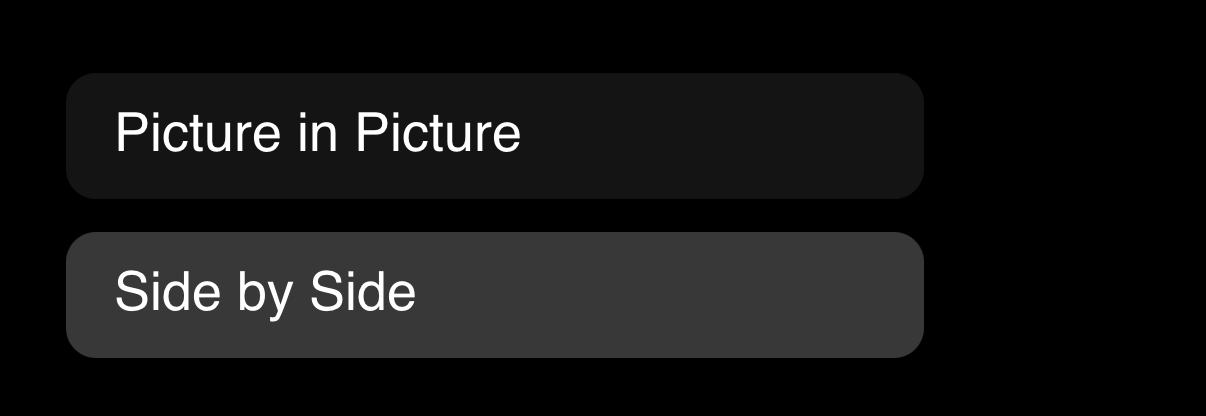
When enabled, you can select between Picture in Picutre (PiP) or Side by Side modes.
Picture in Picture (PiP)
In PiP mode, you will be able to see your two cameras in one frame - the main camera (FRONT) will occupy the main frame whereas the secondary camera (BACK) will occupy the Picture in Picture frame.
You can flip the cameras to switch your FRONT between selfie and main cameras - this is a great way to see what is happening in the back of your recording while keeping main focus on the front of it.
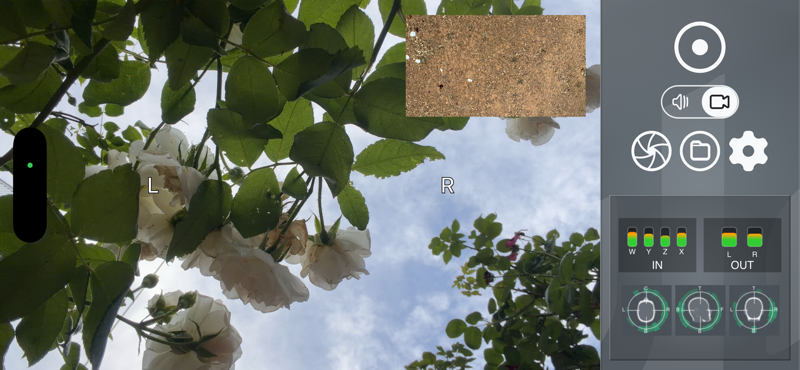
Side by Side
In Side by Side mode, your video contains both camera streams in full resolution so that you can frame the stream you prefer in post.
This means that if your resolution is set to be 4K, your Side by Side will be 4K * 2 in size, and the video will have two 4K streams together that can you later cut and frame into one 4K stream.
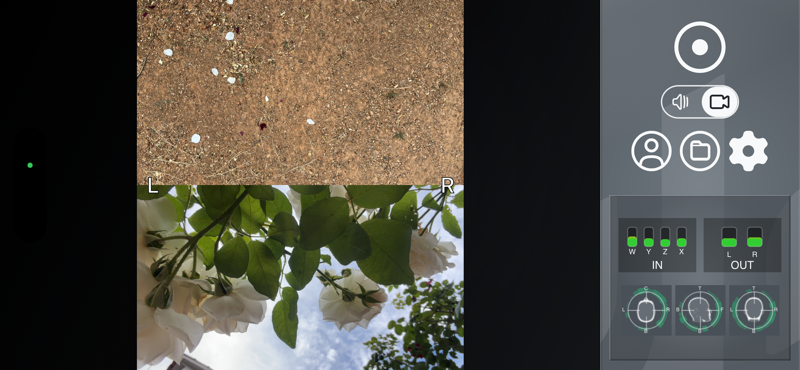
This is great to get a full resolution of whatever is happening on the front and back of your recording!
Additionally, you can also use the FLIP button to toggle the front of the soundfield.
When the device is in landscape mode, the FRONT is the top frame; when in portrait mode, the FRONT is the left frame.
WARING: DO NOT change the orientation of your device (i.e. from Portrait to Landscape modes) WHILE you are recording. The soundfield will always rotate based on the device’s orientation, so when you listen to your recording, you will hear a 90-degree switch in the soundfield!