‘ab Astrometry Delay’
‘ab Astrometry’ features up to eight taps, each acting as an individual acoustic spot that envelops you in sound, transforming the space around your head.This plugin was designed to work with Mono, Stereo, and Ambisonics (1OA through 7OA*, depending on the DAW support)
Depending on the DAW you use, please refer to the end of this guide for punctual comments and tips.
For a user manual of ‘ab Astrometry X’ for iOS, please refer to the end of this guide.
Set-Up
Upon inserting into the DAW, this plugin will try and adjust the input and output of the signal depending on the width of the channel. This assignment can be manually changed. Please mind that even if your input is Mono, your output should be either Stereo or Ambisonics (depending on your selection).
For working in native Ambisonics make sure your DAW is capable of handling 4-channel+ tracks (Nuendo, Cubase Pro, Logic Pro X, Pro Tools Ultimate).
The Ambisonics Order is automatically adjusted depending on your track’s width (For Logic Pro, up to 1OA).
To listen to an Ambisonics signal in your speaker-array, you must use a decoder. Any decoder that works with an Ambisonics signal (Ambix) works - we recommend you our ‘ab Decoder’ or ‘ab Decoder HOA’.


Cross OS | Cross DAW Presets

Factory Presets come ready to be used in any DAW or OS. You can delete the presets and even save new presets. Once a preset is saved, it will automatically be available in any Plugin format on your system (VST3, AU, AAX). Presets are saved as independent files, meaning you can copy them between Windows and Mac so that you can carry them with you or even share them.
On Windows, presets are in “\Documents\Audio Brewers”
On Mac, presets are in “/Users/Shared/Audio Brewers”
Input

The header of the plugin contains different controls that help you work with the dry signal before it is processed.
Depending on your Input Signal, some of the controls will be unavailable.
PRESENCE: Controls the focus of the input signal between discrete (focused) and omnipresent (sounds everywhere, with no spatial information). This control is available only when the input signal is Mono or Stereo.
WIDTH: Controls the stereo image of the signal, from mono, to narrow to wide. This control is available only when the input signal is Stereo.
ab Astrometry Delay

XY Pad
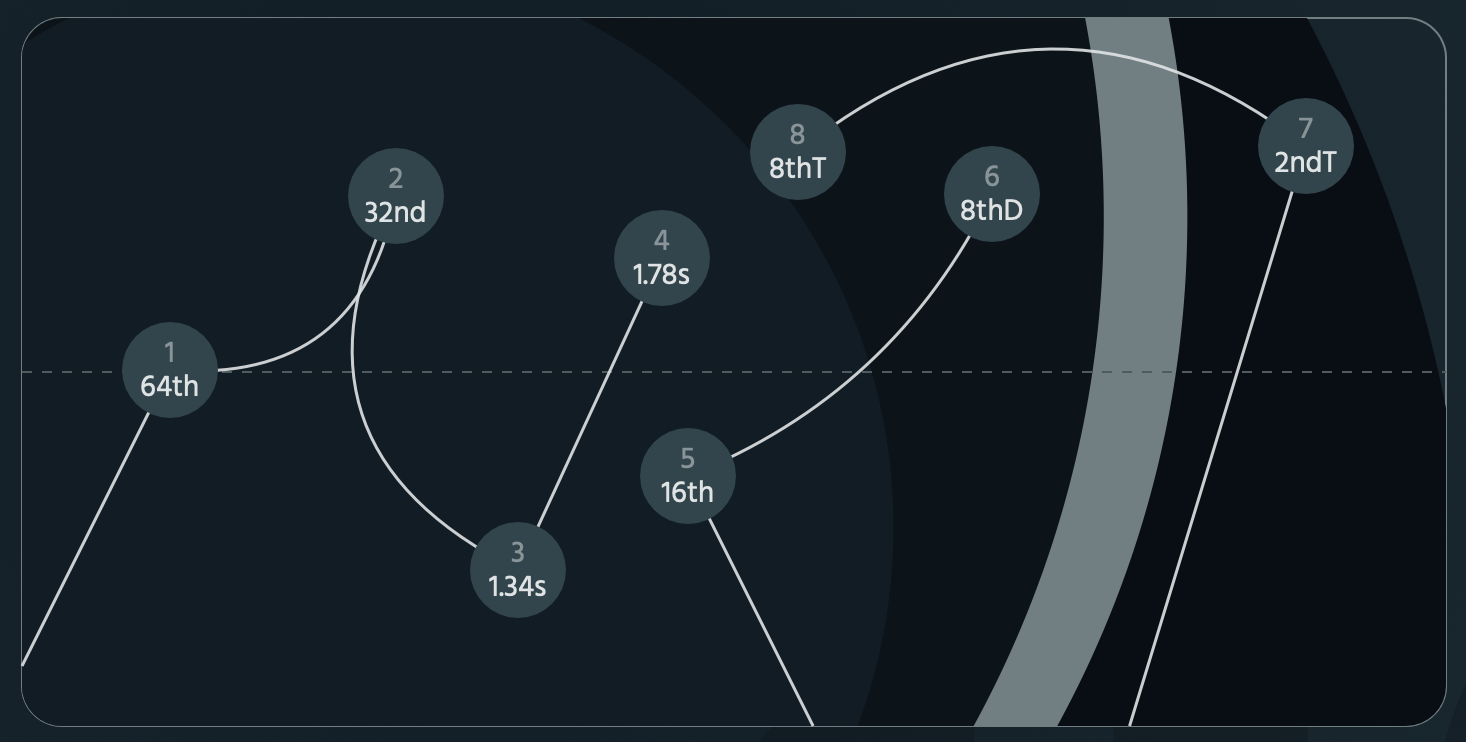
An intuitive XY Pad is available as the main control of ‘ab Astrometry’. In it, the most basic controls of each tap are available.
Each tap is presented as a “Spot”.
By moving each Spot horizontally, the Time of the tap is controlled.
By moving each Spot vertically, the Loudness of the tap is controlled. By double clicking on the tap, it will return to its original loudness.
Aside from the controls mentioned above, each Spot displays its number as well as the current time at which it is working. If the spot is “Synced” to the DAW, it will show the Time in musical intervals (from 64th Triplets to 2nds), if it’s not synced, it will show the time in Seconds (0,001 to 4).
Additional visual cues exist to display the current Viscosity of each tap, represented in the “Viscosity Line” that holds it, which can be completely straight (0% Viscosity) or curved (100% viscosity).
A final visual cue differentiates if a Tap is working in Serial or Parallel mode. If the “Viscosity” line connects the current Spot to the previous Spot, it means it’s working in Serial mode, this means that the Time of the specific Spot will count from the moment the previous Spot tapped. If the Viscosity line connects the current spot to the bottom of the Pad (e.g. to the ‘ground’), it means the specific Spot is working in parallel mode, meaning the Time works from the moment the source sounds, irrelevant to when the previous Spot tapped. Naturally, Spot 1 does not have a “serial” mode, since it always times from the Source.
For example, if Spot 1 is set to 1 Second, and Spot 2 is set to 1 Second, in Parallel mode: 1 second after the Source sounds, both Spots will tap at the same time. If Spot 2 is set to serial mode, 1 second after the source sounds, Spot 1 will tap, and 1 second after Spot 1 taps (i.e. 2 seconds after source sounds), Spot 2 will tap.
Similarly, if Spot 1 is set to 1 Second, and Spot 2 is set to 2 Seconds, in parallel mode: 1 Second after the source sounds, Spot 1 will tap, on the next second (i.e. 2 Seconds after source) Spot 2 will tap. If spot 2 is set to serial mode, 1 second after the source sounds, Spot 1 will tap, and 2 seconds after (i.e. 3 seconds after source), Spot 2 will tap.
Finally, if all 8 spots are set to 4 seconds in Serial mode, Spot 8 will tap 20 seconds after source sound.
Per-tap Controls

By clicking on each Spot on the XY Pad, its controls will be displayed in the Per-tap Controls section (right).
The currently selected Spot can be visualised by the large number on the background.
Four controls are available per tap:
The Viscosity control adjusts the viscosity at which the Time of a tap changes. The higher the viscosity, the “lazier” the time changes.
The Sync control toggles the Sync-to-DAW time. Whilst in sync, the Time of the selected spot will change in musical intervals from 64th Triplets to 2nds. When not in sync, the Time of the selected spot will be free in Seconds, from 0,001 to 4,00 Seconds.
The Reposition Spot button will recalculate the position of the acoustic spot in a random coordinate around the listener.
The Start button will toggle the Spot time between parallel and serial.
Global Delay Controls
To the left of the Per-Tap controls, a set of global Delay controls are available.
The + and - signs can be used to add or remove Spots, hence adding or removing taps.
The Feedback Control control adjusts the feedback of the overall Delay, from once per Tap, to infinite repetitions.
The Dynamic Constellation button toggles our algorithm created to keep the whole delay in constant motion for never-ending variations on the locations of each acoustic spot.
A global Reposition Spot button will recalculate the position of all the acoustic spots at once.


Upon sculpting the Sonic Constellation, two more controls are available to control its loudness and mix levels.
The WET knob controls the loudness of the overall Sonic Constellation.
The MIX knob adjusts the blend between the DRY signal and the WET signal.

Four modulators with independent behavior are available to keep any of the controls in motion.
To enable the Modulators, toggle the button next to the MODS label, by doing it, you will see most of the controls will have four small circles underneath. Use the circles to assign to any of the four modulators.
On the Modulators square, you can select the rate at which the controls modulate (from a few milliseconds all the way to 20 seconds) and below each modulator, a horizontal knob will help you set the minimum and maximum boundaries of each.
Spatial Control
The digital space you have designed on your reverb can be rotated three-dimensionally towards any side (horizontally and vertically). This helps you control your space reflections against the dry signals. It’s a very cool way to achieve different levels of immersion.
Additionally, each dimension can be muted by disabling it with the buttons WIDTH, DEPTH and HEIGHT

Visualiser

A visualiser is also included to visually guide you on how the final output of the sound is being shaped in the sonic field around you.
Additional Controls

Finally, at the bottom-right corner of the plugin, three buttons are available:
A CPU mode button toggles the processing of the plugin between three modes:
LITE - In LITE mode, the plugin works internally in 1st-order Ambisonics, saving most CPU resources.
HIGH - In HIGH mode, the plugin works internally in 7th-order Ambisonics for maximum resolution available.
ULTRA - In ULTRA mode, the plugin works internally in 7th-order Ambisonics just like in HIGH mode, but each acoustic spot is much more dense and defined, this mode might require a lot of CPU depending on the DAW used, so use it with caution! :)
A RESIZE button will bring the plugin’s window size back to its default value.
An ABOUT button (the Audio Brewers logo) will display information about this plugin.
-
Insert a track with the width of your audio file (if you are working with a MONO WAV, insert a MONO Audio Track, for STEREO WAVS, insert a STEREO Track, for Ambisonics WAVS, insert an Ambisonics track (1OA through 7OA).
Insert this plugin with your desired Output configuration, and upon insertion, it will automatically set the Input and Output.
If you are working in Ambisonics, remember to add a decoder at the end of your insert chain to be able to properly listen to the signal.
-
If you are working in Mono or Stereo, regardless of your audio file type, make sure your track has a Stereo configuration. Also, make sure you manually adjust the “Input” setting to match the WAV file.
If you want your output to be Ambisonics, make sure your track is set to Surround, and of course, make sure you decode the signal.
If you are working in Atmos, make sure you use a decoder at the end of the insert chain (e.g. our ab Decoder) to properly listen to the signal.
-
If you want this plugin to work in a Group Track (we recommend this), simply create an Ambisonics group track (1OA, 2OA or 3OA), insert this plugin, and send any of your current tracks to the group track. Cubase Pro | Nuendo will take care of converting the signals automatically!
If you want to work in Stereo, simply insert this plugin in a Stereo Track.
If you want to work in Ambisonics with a Mono/Stereo WAV file, insert an Ambisonics Audio track with your Mono/Stereo WAV file, and upon inserting this plugin, set the Input to Mono/Stereo, and leave the Output as Ambisonics.
If you are working in Ambisonics, remember to select a Decoder (e.g. our ab Decoder) in the panner.
Ambisonics signals are only available in Nuendo / Cubase Pro.
-
If you are working in Ambisonics or Surround formats, remember to set the track width to at least 4 channels. If the track contains 16 channels, this product will work in 3OA format. If the track has 64 channels, this product will work in 7OA format.
If you are working in Ambisonics, remember to add a decoder at the end of the Inserts chain.
-
If you’re working with Immersive Audio, Regardless of your final Output, use this plugin in a Dolby Atmos 9.1.6 track.
The final insert of your track should always be a Decoder (we suggest ‘ab Decoder HOA).
If working in Stereo, work with Stereo tracks just like with any other plugin.
-
If you’re working with Immersive Audio, Regardless of your final Output, use this plugin in a 9.1.6 track.
If you are using this plugin in a BUS, and receiving signal from a Mono/Stereo signal, make sure your BUS is 9.1.6 AND that you have ‘ab Encoder’ encoding from 9.1.6 to Ambisonics, then this plugin should work from AMBISONICS to AMBISONICS.
The Panner of your track should always be a Decoder (we suggest ‘ab Decoder HOA).
If working in Stereo, work with Stereo tracks just like with any other plugin.
-
This plugin is compatible with ALL DAWs. If your DAW only supports Mono/Stereo signals, make your you set the appropriate input/output settings. All ‘under-the-hood’ processing will happen in Ambisonics :)
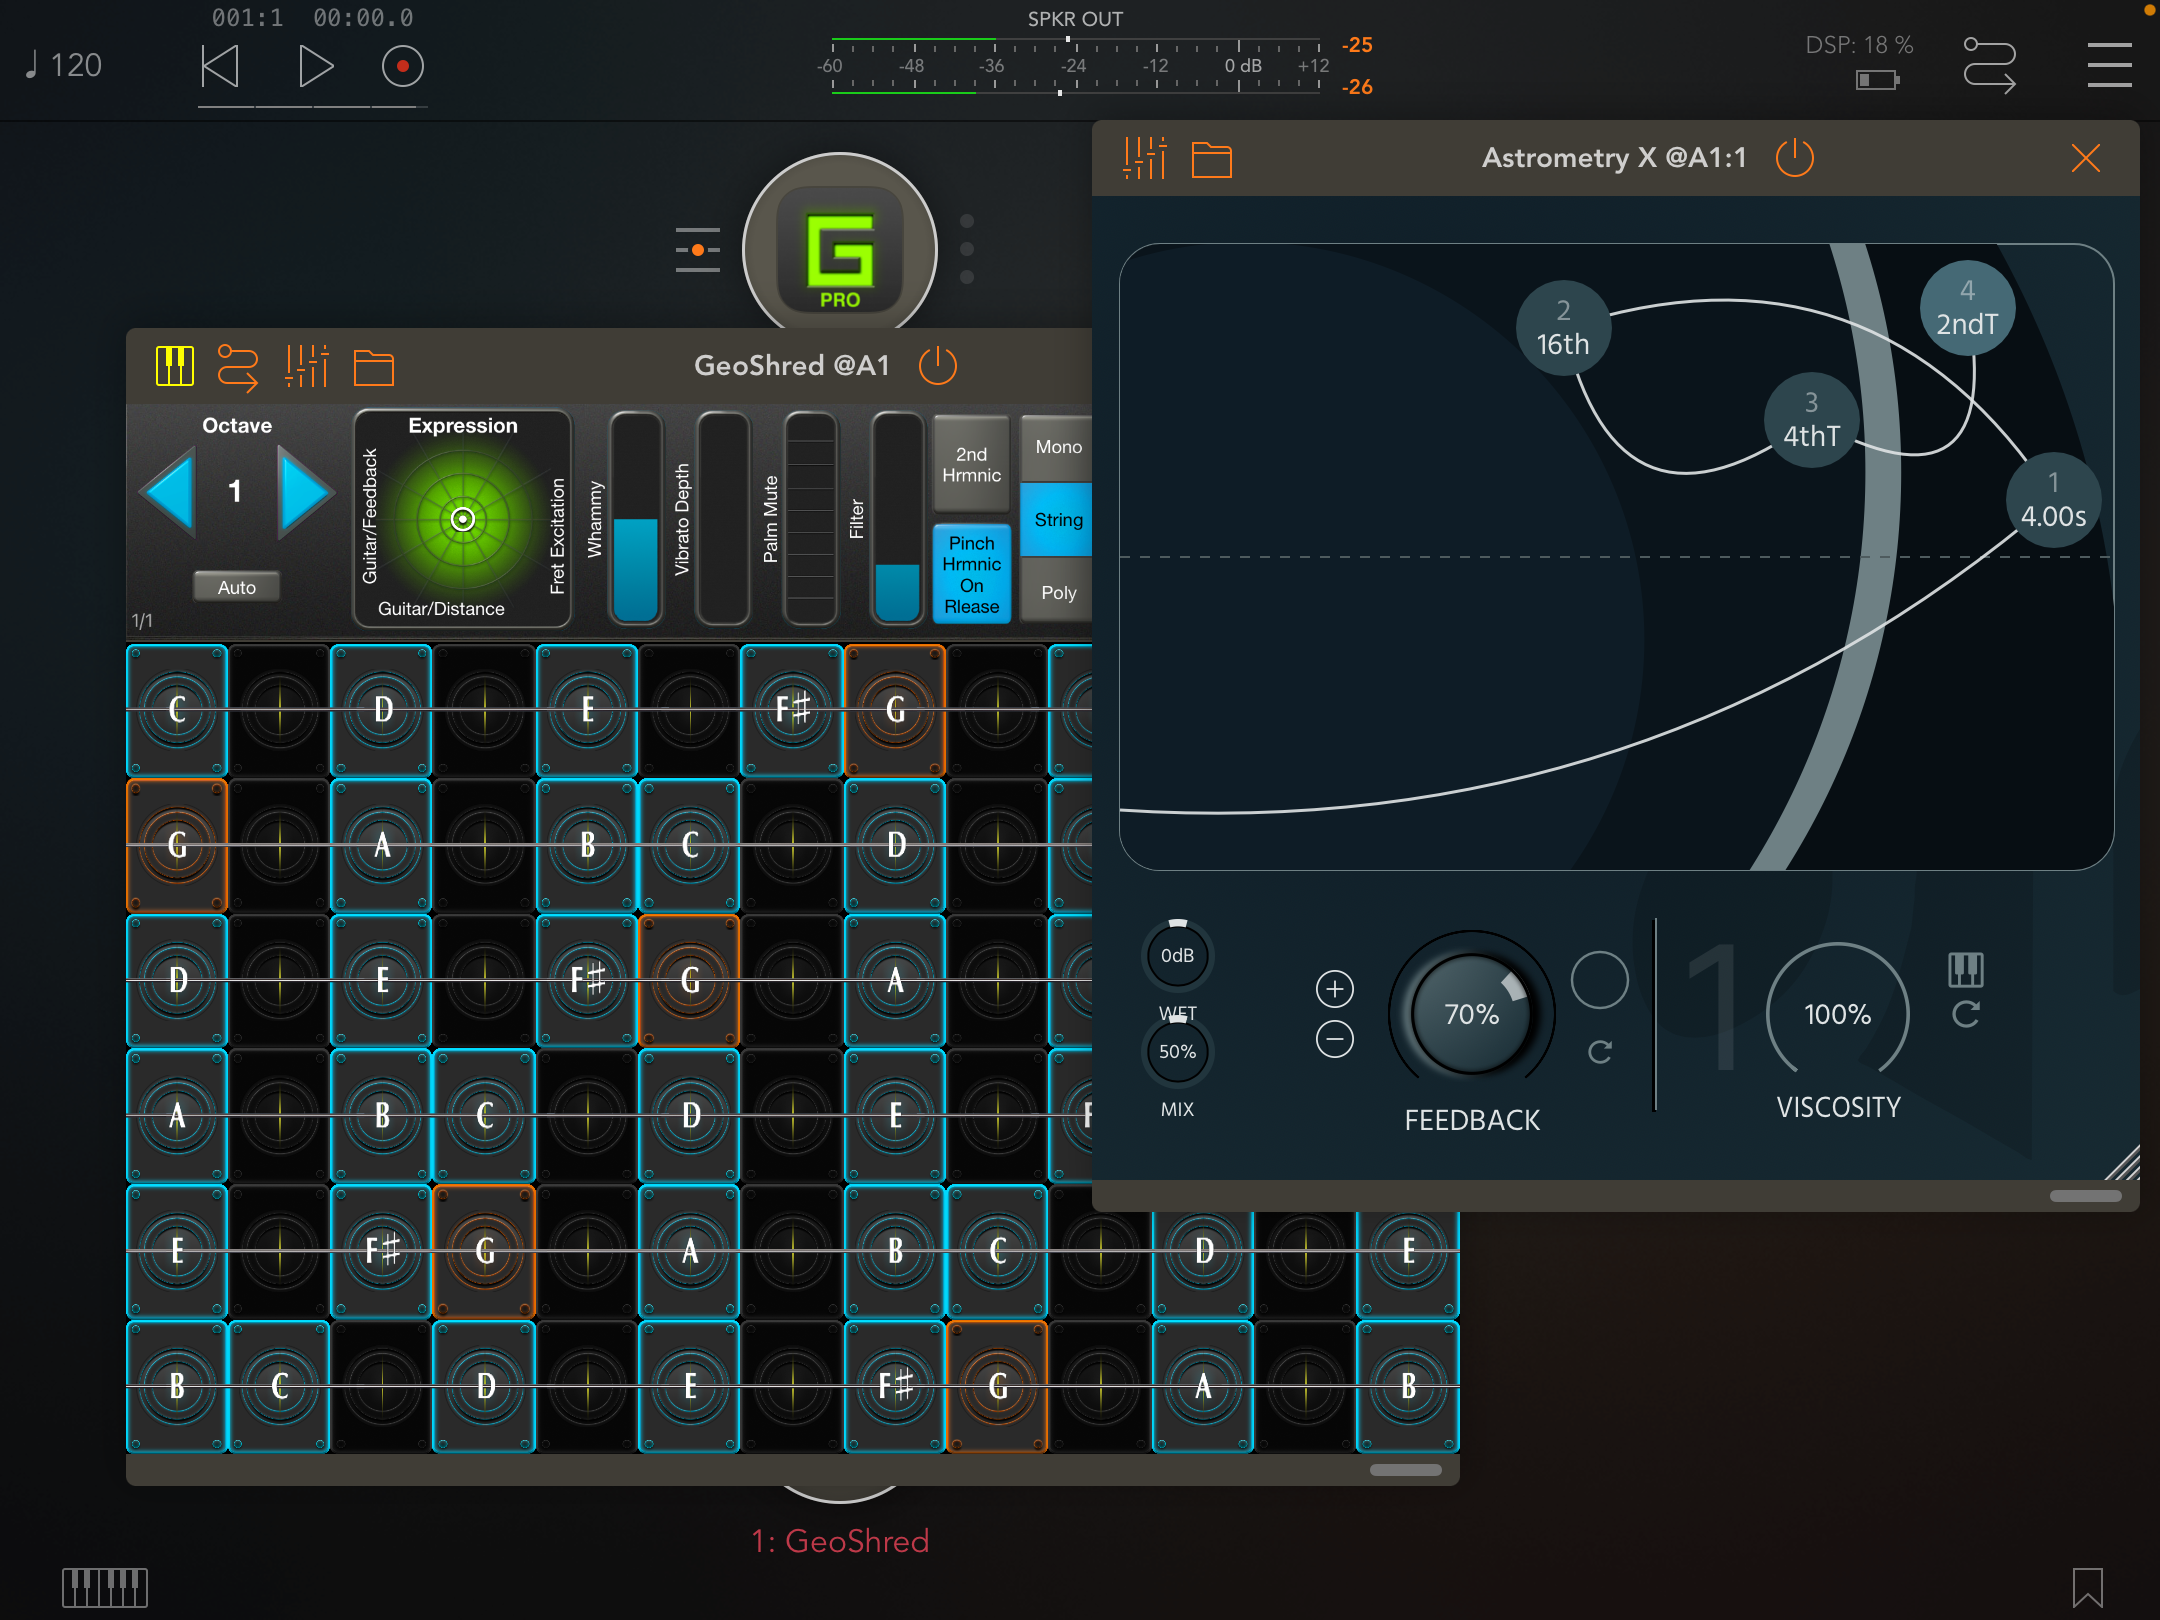
ab Astrometry X
ab Astrometry X comes as a Standalone App or an AUv3 Plugin for iOS devices.
'ab Astrometry X’ behaves just as ‘ab Astrometry’, limited to 4 Taps and Stereo Output.
The plugin window can be operated either horizontally or vertically, as well as it’s fully resizable depending on the host (e.g. AUM).
In ‘ab Astrometry X’, up to 4 Taps can be added using the plug and minus buttons.
Each Tap’s Time and Loudness can be controlled through the XY Pad.
Each Tap’s Time can be toggled between Synced-to-DAW and Free using the Time button at the bottom right half.
Each Tap’s acoustic spot position can be recalculated using the Reposition button located at the bottom right half.
Each Tap’s mode can be toggled between Parallel and Serial using the button located at the bottom right half.
Each Tap’s Viscosity can be controlled using the Viscosity dial located at the bottom right half.
The Plugin’s Feedback can be controlled using the Feedback dial located at the bottom left half.
The position of all the taps can be recalculated using the button located at the bottom left half.
The Dynamic Constellation mode can be toggled on and off using the button located at the bottom left half.
The Loudness of the wet signal can be manipulated using the WET dial.
The Blend between the dry and the wet signals can be controlled using the MIX dial.

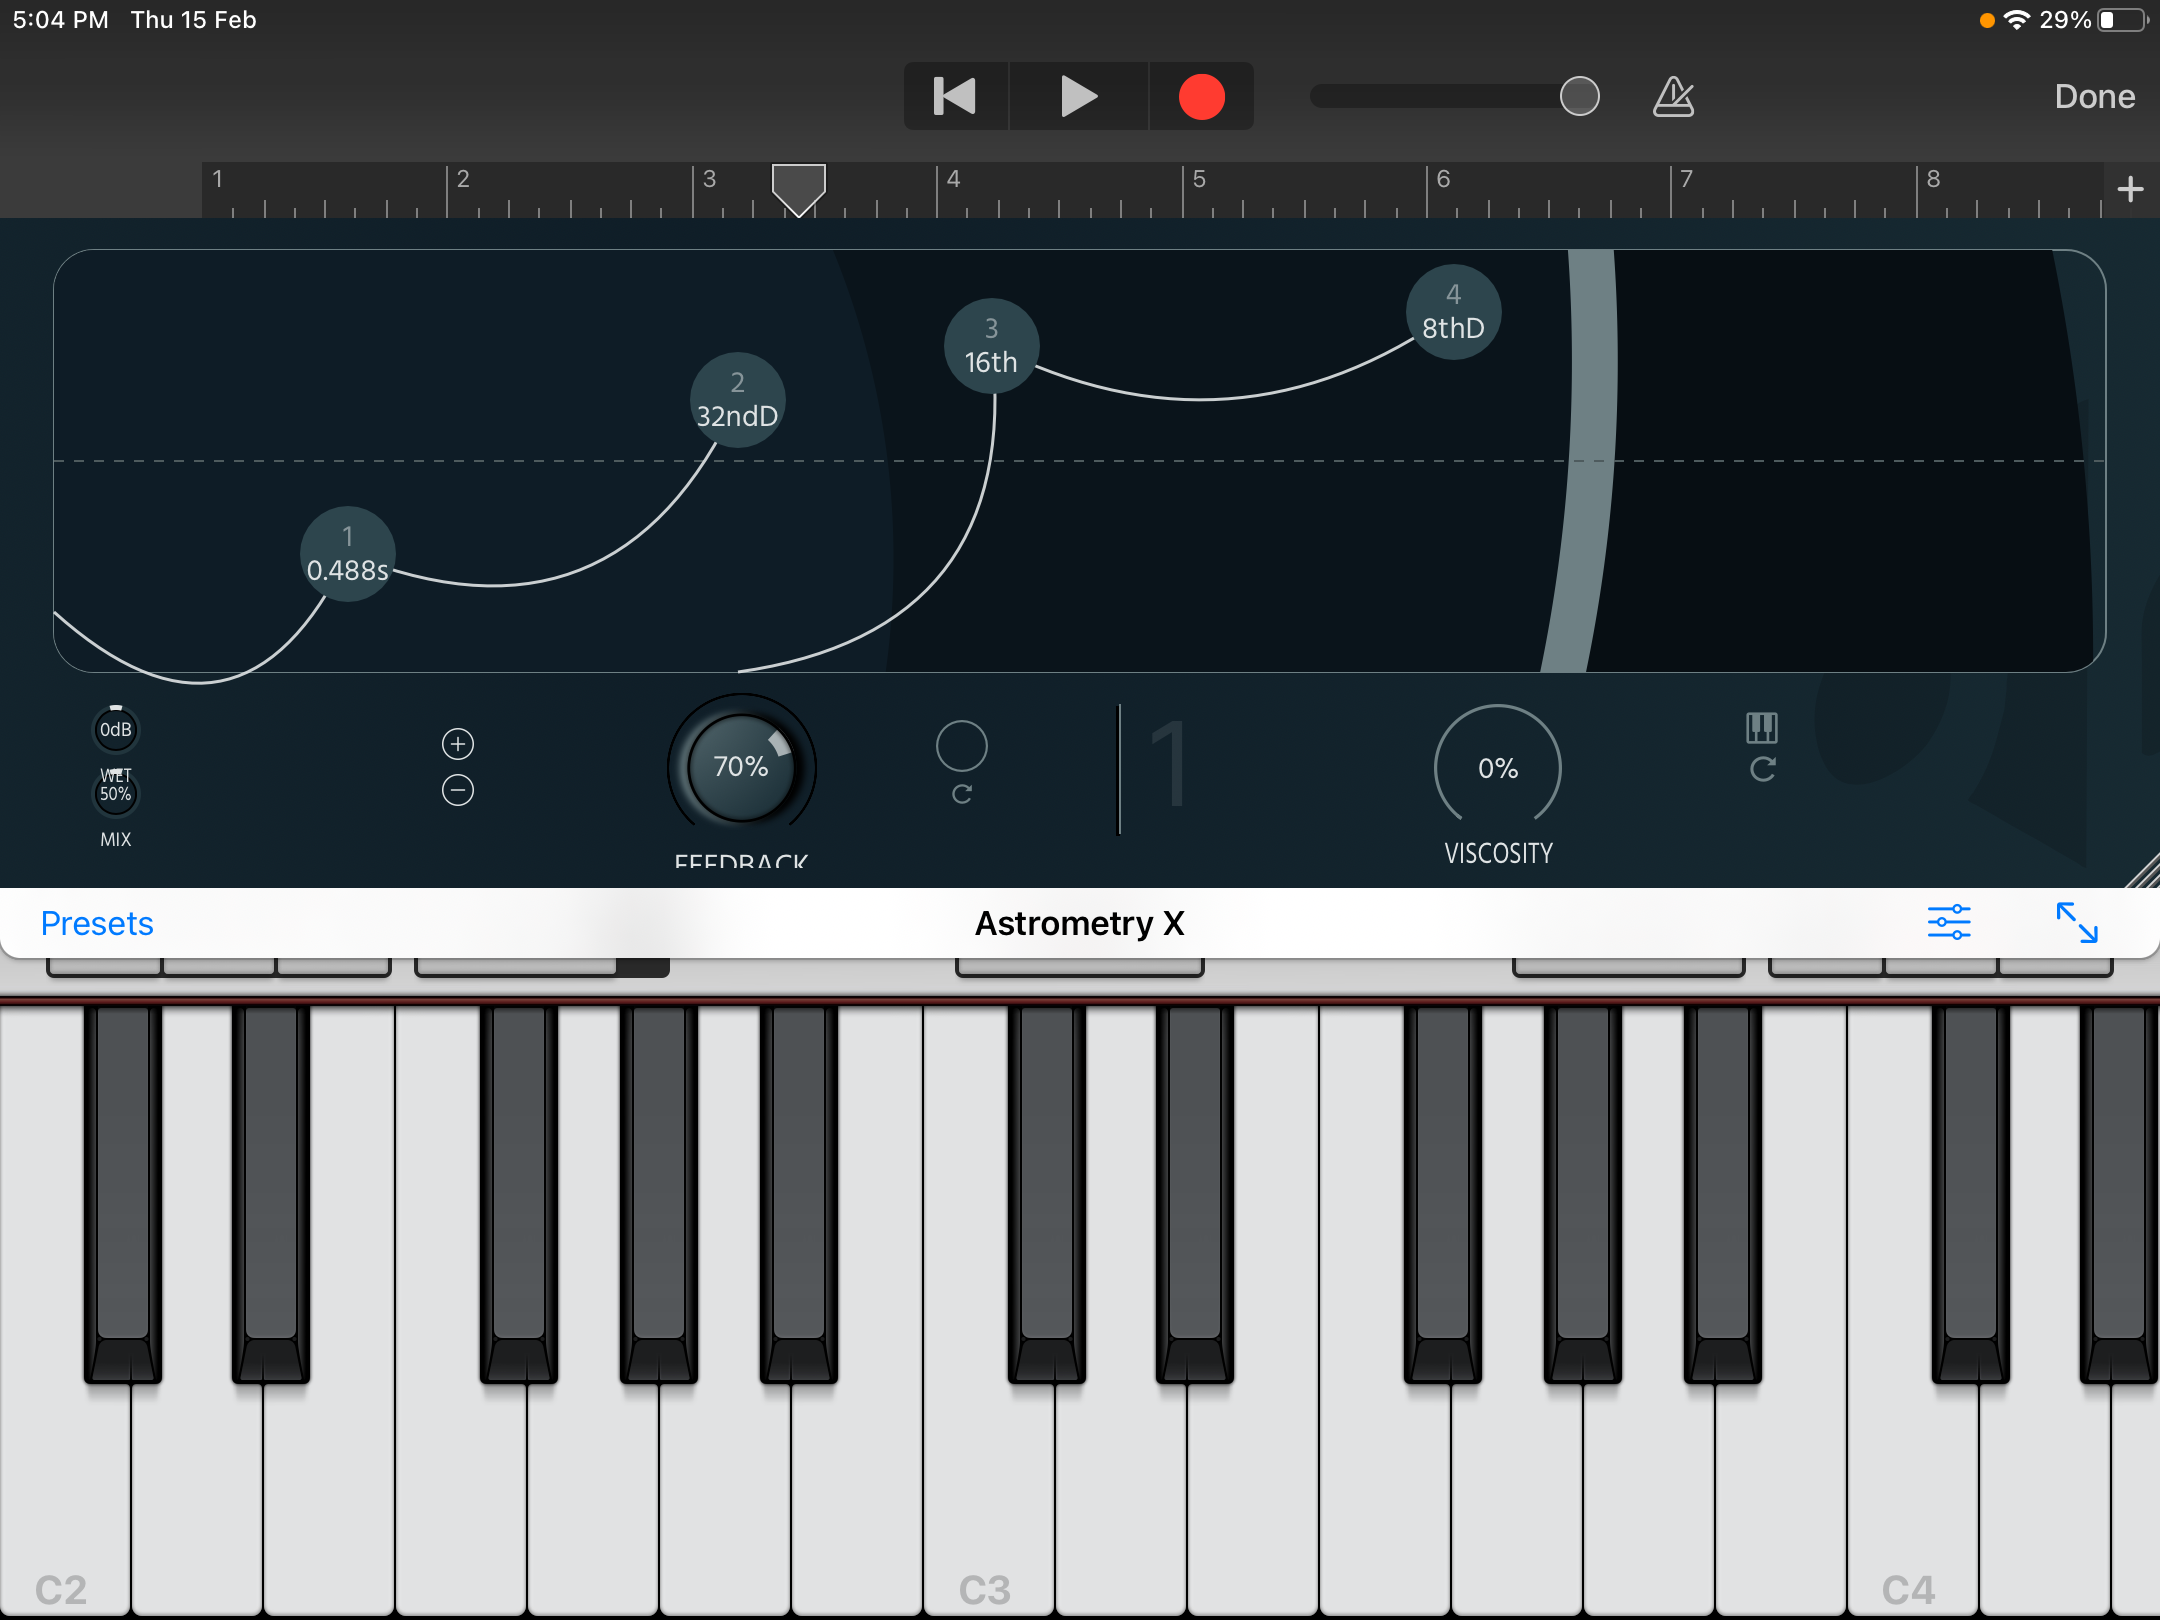
As Standalone:
Upon opening, the input will be Muted to avoid feedback., make sure to unmute it by touching the button on the Top-Right.
We recommend you use an external Sound Card as well as headphones to avoid Feedback on the Signal.
As a Plugin:
On your iOS DAW, simply insert the plugin in any of the tracks. Make sure your DAW supports AUv3 Plugins (e.g. Garageband).
Note: ab Astrometry X works exclusively in Stereo, although all the calculations under-the-hood happen in Ambisonics, the output will automatically be decoded to Stereo.