‘ab Advanced Decoder’
Depending on the DAW you use, please refer to the end of this guide for punctual comments and tips.
MacOS USERS: Unless you use Logic Pro, AWLAYS use the VST3 version of our plugins - AU versions were written specifically for Logic Pro.
Set-Up
There's nothing special you need to do here! As soon as you insert the plugin in an Ambisonics track, ‘ab Advanced Decoder’ will automatically detect the signal’s order and adapt the output so that you can use all the channels available.
Please mind an Ambisonics signal must run through the decoder, this plugin is not compatible with mono, stereo or other discrete-channel signals. Make sure you encode them to Ambisonics before running them through the decoder.
ab Advanced Decoder
ab Advanced Decoder can work in three different modes: AUTO, Spots (Beams), and Speakers. Each mode was created for a specific task and will help you adjust your decoded signal to your specific needs.
‘AUTO’ mode
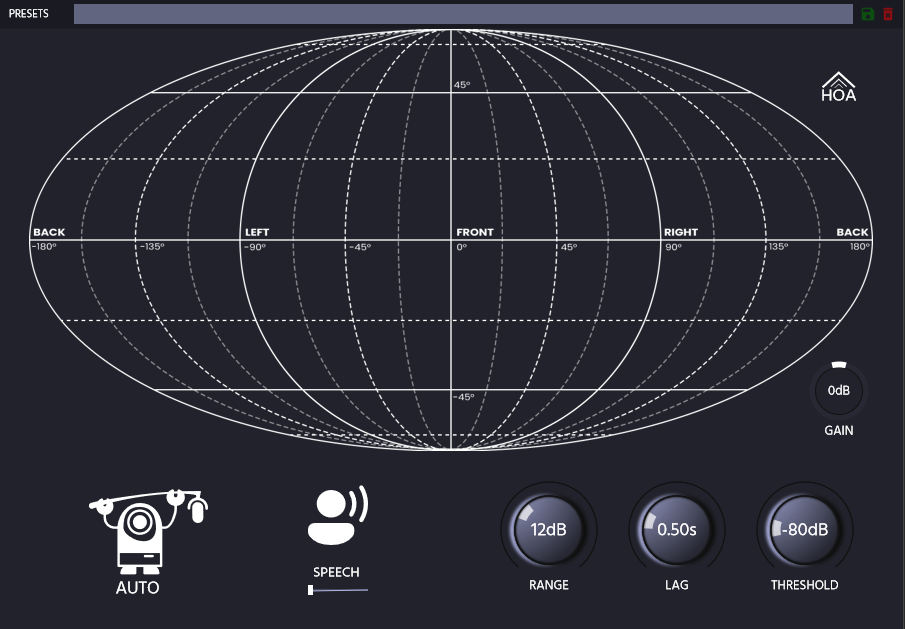

The ‘AUTO’ mode was created as a way to easily set up the plugin to automatically select the most optimal spot and output it as a mono signal. The plugin will constantly scan the three-dimensional soundfield and create a spot that focuses where the sound is dominant (louder).
This mode is perfect for users who wish to use an Ambisonics microphone for capturing dialogue, for example: The ‘AUTO’ mode will always focus the output to where the voice of the talent is coming from. This is great for field recording or even podcasting, where one microphone can easily capture as many voices as there are around it, never having to worry about the voices being off axis. After capturing, you can switch the plugin to manual mode if you want to output each voice to a different channel.
When the AUTO mode is enabled, the plugin will upscale the incoming Ambisonics signal to 7th-Order (if the Upscaler is enabled), and then focus the sound to the automatically selected area and finally, will create a MONO output with the final signal.
When this mode is enabled, there are no custom speakers or beams available, one Beam will always be created and output as a Mono signal.
Controls:

Five controls are available when the AUTO mode is enabled:
AUTO toggle: Toggles the AUTO mode ON and OFF.
VOICE button: When ON, the plugin will prioritise frequencies common to the human voice - keep this enabled if you want to monitor human voices, for any other application (foley, etc.), set it to off.
The SPEECH slider allows you to enable the Advanced Noise Suppression Algorithm and control the level of noise suppression. This algorithm has been designed for SPEECH only (i.e. not singing voices or other types of sounds).
The RANGE knob allows you to widen the “spot” that the plugin creates. The higher the range, the more tolerant ‘ab Advanced Decoder’ is to include sounds that are X dB below the loudest signal. This control is very useful in case you have two sound sources that are producing sound at different levels, or in case you want to tighten the loudness detection.
The LAG dial will help you control the speed at which the plugin discards sounds that get out of the scope of the created beam (i.e. under threshold or outside the range).
The THRESHOLD is a simple gate that will ensure that whatever is below a specific loudness is simply ignored by the detection algorithm.
‘SPOT’ mode
Audio Brewers’ Beamforming algorithm compared to others.

In SPOT mode, ‘ab Advanced Decoder’ works as an advanced Beamformer.
This mode is great for creating one or more independent beams when the user wants to narrow down a specific sound in the three-dimensional soundfield.
When SPOT mode is enabled, the sound that enters the Decoder will automatically be upscaled internally to 7th-Order (if the Upscaler is enabled) and then, the desired spots will be created.
Each spot can be placed freely by clicking on the visualiser or manually inputting the Azimuth and Elevation in the AZ and EL text boxes, and their size can be independently controlled. Additionally, pass filters can also be applied to each beam independently.
The maximum number of available beams depends on the width of the output of the track where the Decoder is inserted. Meaning that if you are in Pro Tools and insert the Decoder as Ambisonics -> Stereo, you will have up to 2 beams available. Equally, if you insert it as Ambisonics -> 9.1.6, you will have up to 16 beams available.
Additionally, if you are in Reaper and insert the Decoder in a 64/64 track, you will have up to 64 Beams available.
Each beam is named by what the DAW names it (if the DAW gives names to channels), for example, L, R, C, LFE, etc. If the name of the beam is N/A, it means that the specific beam is outside the width of the DAW’s track, so it cannot be used.
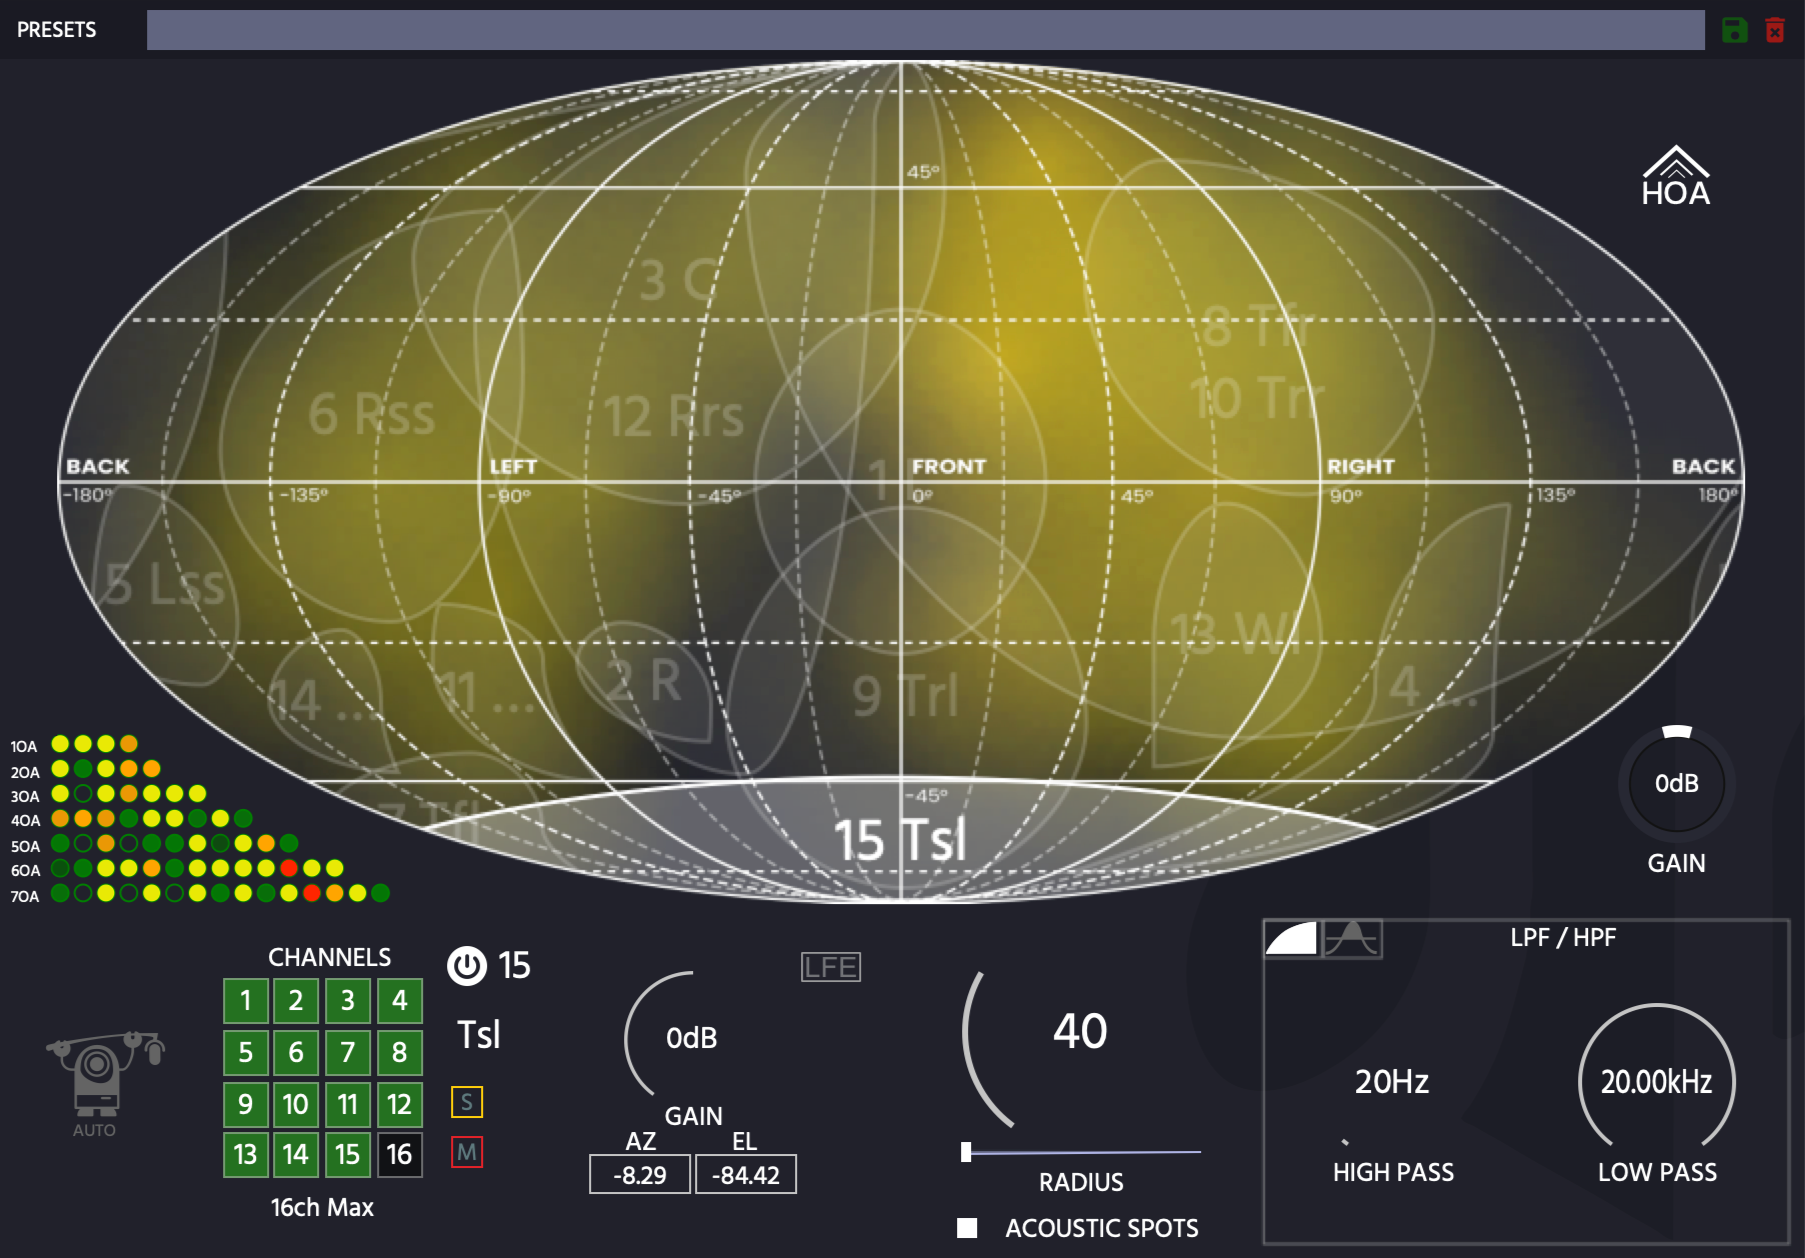
Let’s explore all the controls available when ‘ab Advanced Decoder’ is in ‘SPOT’ mode.
Controls:
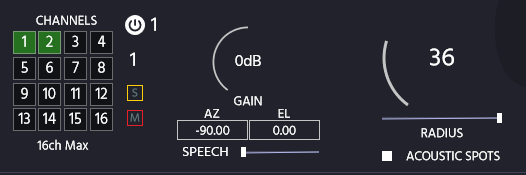
A CHANNELS panel shows all the channels available, they channels to be displayed can be 16, 32 or 64, this can be toggled by clicking on the buton “16ch Mach”, “32ch Max”, or “64Ch Max”. Please mind that the fact that 16, 32, or 64 channels are displayed, it doesnt mean the beams are ON.
Each channel button can have four colours: Dark (the Spot is Off), Green (the Spot is On), Yellow (The Spot is Soloed), or Red (the Spot is MUTED). Finally, if a spot has been assigned as an LFE, the colour will be BLUE, this is a practical way to track the status of every spot.
When a Spot is selected, the controls for that spot are visible - next to the number of the Spot, an ON/OFF button will allow you to toggle that specific Spot ON and OFF.
Under the ON/OFF button, the name of the Channel is displayed, if N/A is listed, it means that Spot is not available because the track is not wide enough (for example, channel 3 in a Stereo track).
A SOLO and MUTE button will allow you to Solo Or Mute that specific spot.
A GAIN control allows you to control the loudness of a specific Spot.
An Azimuth (AZ) and Elevation (EL) text box will help you fine tune the centre of each of the spots. Each spot can be placed and dragged with the mouse in the projection, but you can also manually input the location of each of the spots by inputting the numbers here. In Azimuth, negative values = Left and positive values = Right, in Elevation, negative values = Below, positive values = Above
A SPEECH slider is available in spots 1 through 4 to enable the Advanced Noise Suppression Algorithm. Raise the slider to increase the level of suppression, lower the slider to 0 to disable the noise suppression engine. The noise suppression algorithm has been designed to suppress noise on SPEECH (i.e. not singing voices, instruments or other noises).
WARNING: Enabling the noise suppression algorithm in any of the channels will introduce latency that will be automatically compensated by the plugin. For this reason, we recommend suppressing noise when mixing, and not for live situations.
An LFE button will assign that specific Spot as an LFE, meaning that it will behave Omnidirectionally (no Azimuth or Elevation controls) and will be excluded from the Beamforming calculations.
A RADIUS control contains two parts: The Dial will help you increase the radius of the spot whereas the slider will increase its height only.
Finally, a button to toggle between ACOUSTIC SPOTS mode and SPEAKERS mode will help you switch between these modes.
Note: Due to the own nature of Ambisonics signals, when beams are at their narrowest setting, make sure no two beams are under 12°, otherwise you might hear the same result (I mean, 12° is an insane close distance :) ).
'SPEAKERS’ mode
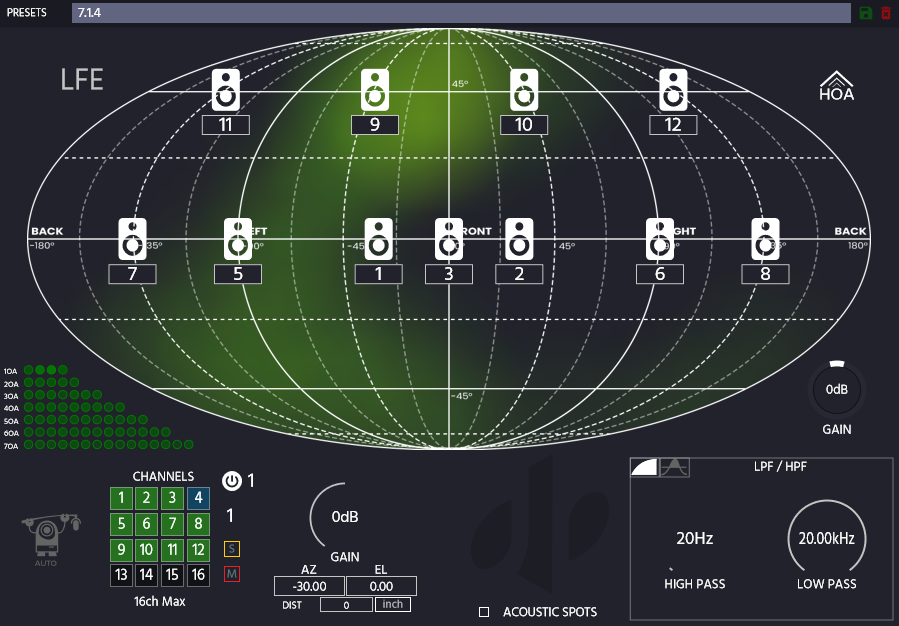
When “ACOUSTIC SPOTS’ mode is toggled OFF, ‘ab Advanced Decoder’ works in SPEAKER mode.
This mode is great for creating speaker layouts all the way from 1 speaker to 64 speakers - 62 of them (3 to 64) can be assigned to be LFE signals. This is a great tool to simply adapt the decoder to your workflow - regardless of whether you use good old Stereo, Surround, Atmos, AURO, or even custom speaker arrays, the flexibility of the decoder helps you shape your digital environment to match that of your mixing room.
The best part is that, unlike the traditional decoding methods, where higher orders might introduce acoustic holes when working with few speakers and a sound source is far from them, ‘ab Advanced Decoder’ calculates your acoustic scene to always cover the whole three-dimensional sphere and distribute the sound to as many speakers as you have!
As you place the speakers around the listener, ‘ab Advanced Decoder’ will recalculate the sound projection per-speaker on-the-fly! No need to hit any recalculation buttons!
The maximum number of available speakers depends on the width of the output of the track where the Decoder is inserted. Meaning that if you are in Pro Tools and insert the Decoder as Ambisonics -> Stereo, you will have up to 2 Speakers available. Equally, if you insert it as Ambisonics -> 9.1.6, you will have up to 16 Speakers available.
Additionally, if you are in Reaper and insert the Decoder in a 64/64 track, you will have up to 64 Speakers available.
Each Speaker is named by what the DAW names it (when available), for example, L, R, C, LFE, etc. If the name of the Speaker is N/A, it means that the specific speaker is outside the width of the DAW’s track, so it cannot be used.
Let’s explore all the controls available when ‘ab Advanced Decoder’ is in ‘SPEAKER’ mode.
Controls:
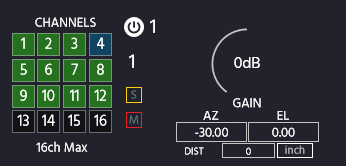
A CHANNELS panel shows all the channels available, they channels to be displayed can be 16, 32 or 64, this can be toggled by clicking on the buton “16ch Mach”, “32ch Max”, or “64Ch Max”. Please mind that the fact that 16, 32, or 64 channels are displayed, it doesnt mean the speakers are ON.
Each channel button can have four colours: Dark (the Speaker is Off), Green (the Speaker is On), Yellow (The Speaker is Soloed), or Red (the Speaker is MUTED). Finally, if a Speaker has been assigned as an LFE, the colour will be BLUE, this is a practical way to track the status of every spot.
When a Speaker is selected, the controls for that spot are visible - next to the number of the Speaker, an ON/OFF button will allow you to toggle that specific Speaker ON and OFF.
Under the ON/OFF button, the name of the Channel is displayed, if N/A is listed, it means that Speaker is not available because the track is not wide enough (for example, channel 3 in a Stereo track).
A SOLO and MUTE button will allow you to Solo Or Mute that specific speaker.
A GAIN control allows you to control the loudness of a specific speaker.
An Azimuth (AZ) and Elevation (EL) text box will help you fine tune the location of each of the speakers. Each speaker can be placed and dragged with the mouse in the projection, but you can also manually input the location of each of the speakers by inputting the numbers here. In Azimuth, negative values = Left and positive values = Right, in Elevation, negative values = Below, positive values = Above
A DISTANCE option is available in case you’re using a non-calibrated speaker layout. In it, you can manually set the distance of each speaker to the centre (in inches or cms) to have ‘ab Advanced Decoder’ calculate the delay compensation each speaker needs so that all signals arrive at the same time.
WARNING: IF you have a calibrated system, LEAVE DISTANCE ALONE, always in 0, as adding a distance setting will actually add a delay to your already calibrated output!
An LFE button will assign that specific Speaker as an LFE, meaning that it will behave Omnidirectionally (no Azimuth or Elevation controls) and will be excluded from the Beamforming calculations.
FInally, a button to toggle between ACOUSTIC SPOTS mode and SPEAKERS mode will help you switch between these modes.
Note: Due to the own nature of Ambisonics signals, when beams are at their narrowest setting, make sure no two beams are under 12°, otherwise you might hear the same result (I mean, 12° is an insane close distance :) ).
General Controls
Some controls are globally available regardless of the mode you are working on, let’s explore them:
HOA Upscaler

This button, located on the top-right of the plugin, will enable the internal upscaler of the Decoder, when the button is ON, the decoder is working. How does it work?
When the signal enters the decoder, the decoder detects the incoming order, if the order is below 7, the Upscaler will automatically upscale the signal to 7th order before proceeding with the decoding process.
Having an internal Upscaler is an extremely practical way to ALWAYS working in 7th-Order, even if your DAW is limited to lower orders - so for example, if you are in Logic Pro, where 1OA is the maximum supported order by our plugins, or in Studio One where it’s 3rd-Order, or in Pro Tools Studio… With the Upscaler toggled ON, you will always work in 7th-Order internally!
This is a great to automatically increase the resolution of the signal before it’s sent to your speakers, however, it comes at a cost of CPU power, this is why you can also disable it.
So how is this different from the ‘ab Imager - Upscaler’?
While the Upscaling algorithm is the same as in our regular Upscaler, the key difference lies in where it’s applied in your signal chain.
With ‘ab Advanced Decoder’, the Upscaler is applied at the final stage, right before decoding. This means:
If your DAW doesn’t support 7th-Order, or
If you just want to decode an Ambisonics signal without further processing,
then the Upscaler in ‘ab Advanced Decoder’ behaves exactly the same.
However, if your DAW does support Higher Orders and you plan to process the Ambisonics signal (e.g., adding delays, reverbs, etc.), it’s always better to place an Upscaler at the very beginning of your signal chain. This ensures that all processors work with an already upscaled signal, giving you more accurate and effective spatial results.

At the bottom left of the projection, a per-order visualiser will detect and display the order at which the Decdoer is working, so when the Upscaler in turned on, you should always see the visualiser displaying a 7th-Order signal, otherwise, only the incoming order will light up.
Pass Filters

When working in either Speaker or Spot mode, Low-Pass and High-Pass filters are available per Channel. This is a great way to control the frequency range that passes through that specific Channel - for example, if your channel were an LFE channel, it could be wise to low-pass whatever is under 120Hz so as to avoid your subwoofer from receiving useless audio.
Spatial Gate

We have created a Spatial Gate designed precisely to do what the title says: It gates the sound that happens around the listener below a specific range! A great way to further filter out sounds that might be off-axis from a specific Spot or Speaker!
The Gate is global, meaning once enabled, it will work on all your channels, and it contains two simple controls.
How does the gate work? Well, imagine that you have your whole spatial sphere full of sound, but the loudest dominant sound is coming from the left side, and you have a speaker on the left, and another on the right side… if the gate is enabled, then the sound will be gated and the right speaker will not produce any sound!
A LAG control allows you to control the speed at which the gated sound fades out, and a RANGE control helps you fine-tune a tolerance level to what is gated, the higher the range, the more tolerant is the plugin before filtering sound out. The range is calculated against the loudest spot in the soundfield.
Extra Controls
At the bottom of the window:

A CPU button allows you to toggle between LITE and ULTRA modes. In ULTRA mode, ‘ab Advanced Decoder’ works in full-throtle, if you have an older CPU or many instances, you might want to consider setting the plugin in LITE mode. In LITE mode, the Upscaler is disabled and the processing algorithm is more relaxed, offering less resolution in small beams, but freeing resources.
Our recommendation is: When tracking, set the plugin in LITE mode and enable the MONITOR mode. When mixing, set the plugin in ULTRA mode and disable the MONITOR mode.
-
If your audio is not Ambisonics, encode it to any Ambisonics order.
If your audio is Ambisonics, insert it in an Ambisonics track (1OA through 7OA).
Insert this plugin with the output width of your choice.
-
Make sure your signal is Ambisonics (if it’s not, encode it using ‘ab Encoder’
Insert this plugin.
-
Insert this plugin in an Ambisonics track AS A PANNER, and make sure the signal running through it is Ambisonics (encode it to Ambisonics if it’s not)
-
Make sure your signal is Ambisonics, encode it to Ambisonics if it isn’t.
Remember to set the track width to at least 4 channels. We highly suggest you simply use a 64in/64out track.
-
As Resolve 19 and above come with an included Decoder that cannot be swapped, this plugin is only useful if you want to grab 1 beam from an Ambisonics signal. To do that, insert the plugin in an Ambisonics track, and insert this plugin to create only 1 beam.
-
Use this plugin in a 9.1.6 track.
Make sure the signal running through it is Ambisonics.
Insert this plugin AS A PANNER.